How to change the keyboard layout on Windows? – step-by-step guide (with photos)
This article is for everyone who doesn’t know how to or has trouble changing their keyboard layout to some standard one (which comes with the system). It doesn’t show you how to change to custom layouts – that’s a bit more advanced.
Here I will walk you through changing your keyboard layout step by step in Windows 10, Windows 8, and Windows 7.
If you don’t know what keyboard layout is you can read my article about it. You will benefit from knowing some basic information about keyboard layout in general before changing your current one. You can read the article here – ARTICLE WHAT IS A KEYBOARD LAYOUT
How to change your keyboard layout on Windows 10?
This will show you how to change to standard layouts. The ones that are native to Windows OS.
Changing your layouts is actually very simple once you know what to do. It’s something that not many people need to change so we don’t know how to do it. But don’t worry, it’s very straight-forward:
Changing your keyboard layout on Windows 10 isn’t complicated. First, you need to get to language settings on your computer. Then under your language open up “Options”. Then you will be able to change your keyboard layout from the list (look at the step-by-step guide).
Now, let’s get into changing your keyboard layout.
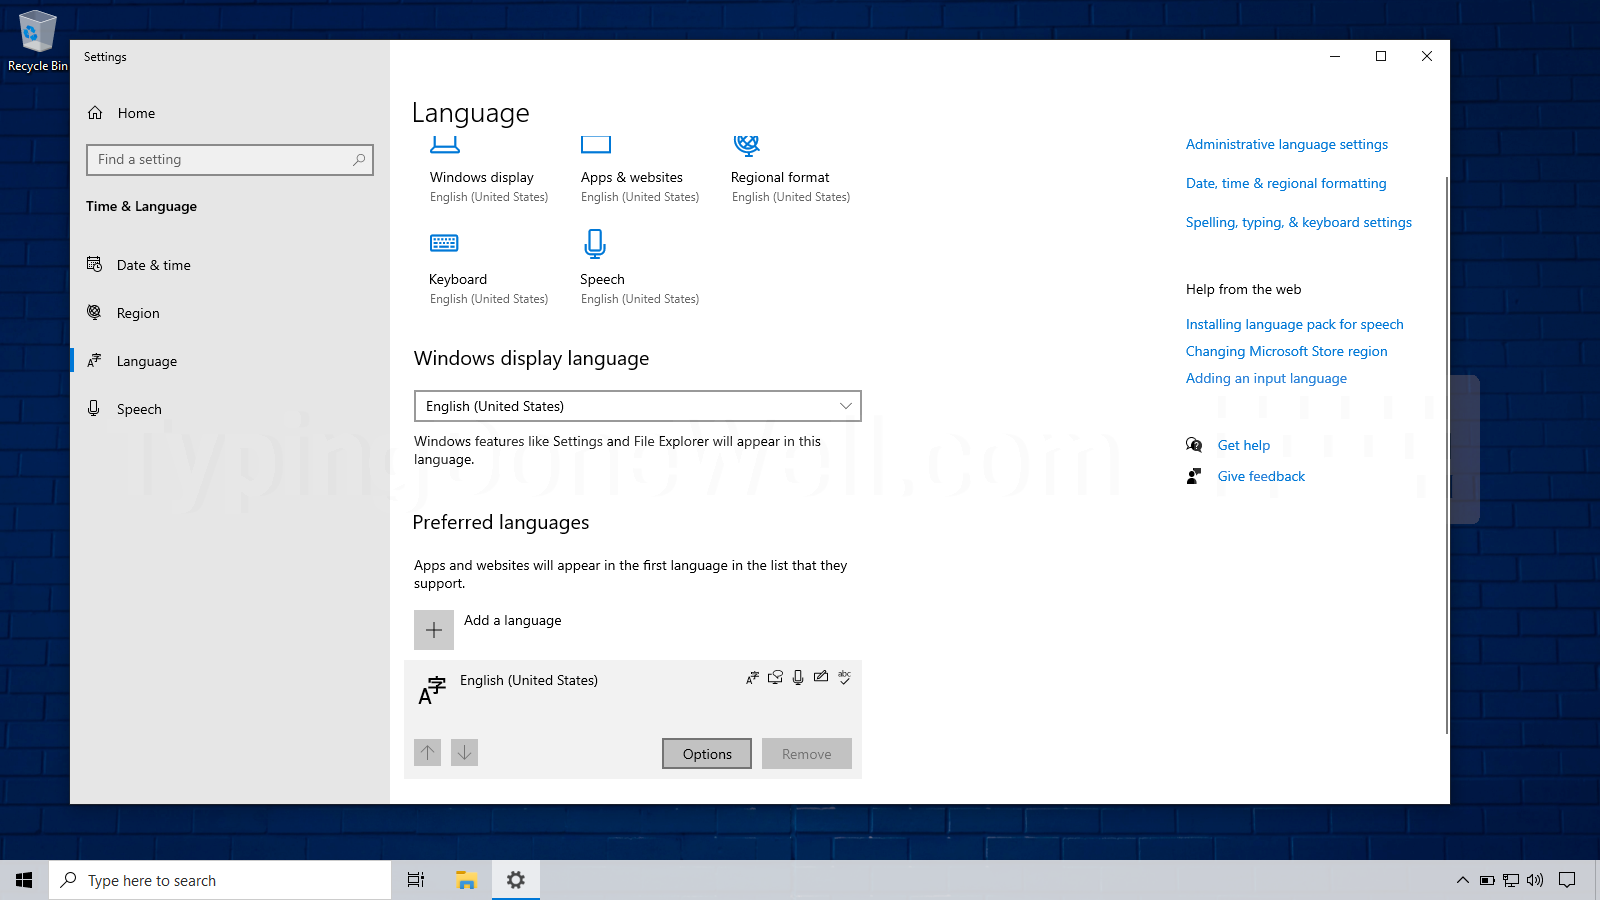
1. Go to language settings
There are two main ways you can do this – the faster one which I use all the time and the long way around the method. Let’s start with the short one.
Use search to open language settings
The easier and faster way for you to do that is by searching the proper setting directly from the start menu:
- Click on Search on the taskbar
- Type “edit language”
- Click on “Edit language and keyboard options”
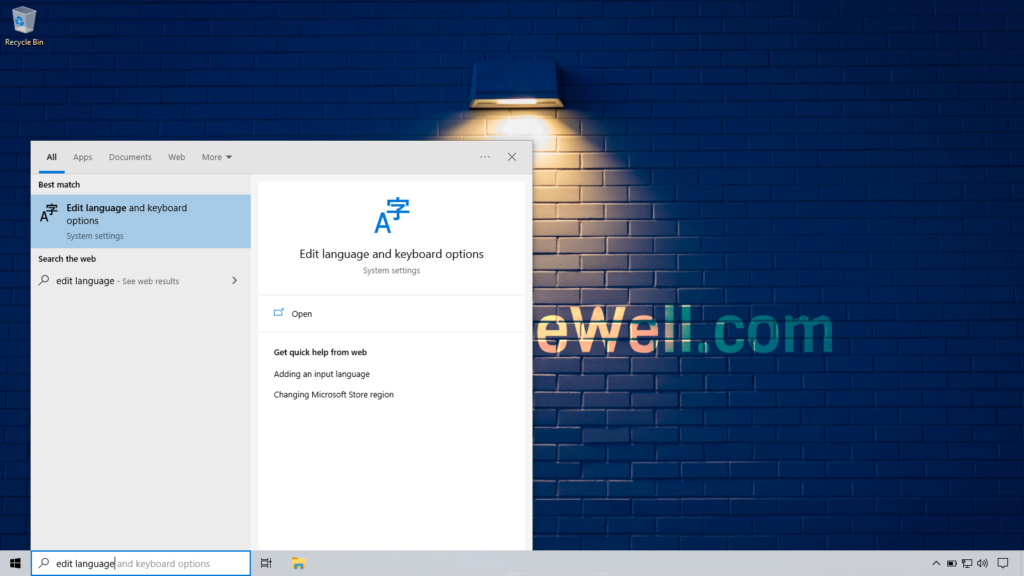
Pretty easy to do, isn’t it? That’s a very fast way to open the proper setting that you need when changing the layout. I use it when I need to change mine.
Manually go to language settings
This is the longer method that you can alternatively use. Maybe your search stopped working? Or anything else – I give you a second way to get there:
- Click on Start
- Open the Settings app
- Go to “Time & Language”
- Click on the “Language” tab in the menu on the left
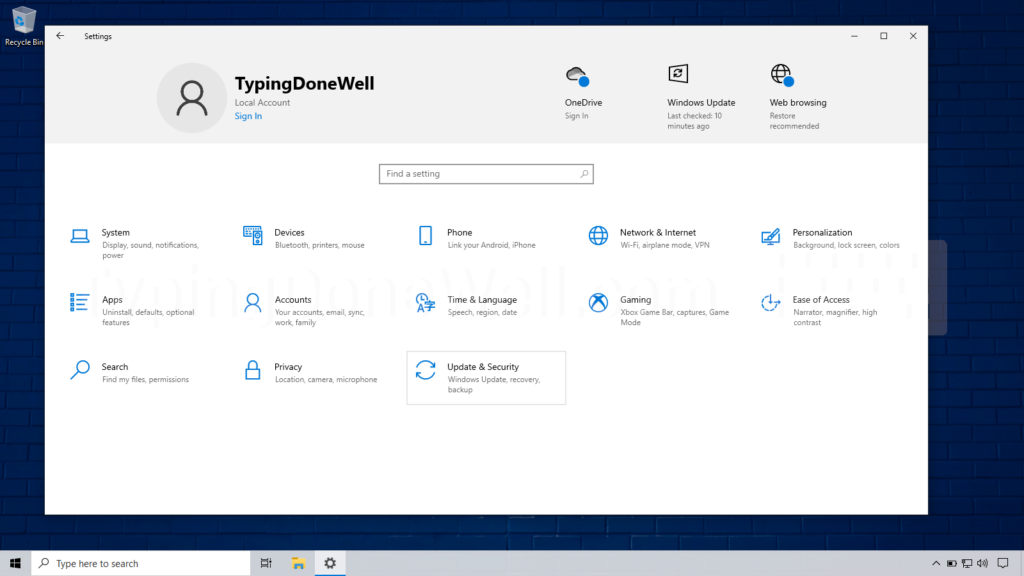
There you go. You can use either way to get to the proper setting. The important thing is that you actually get there.
2. Choose your language and click it
Here what you need to do is choose the language you are using. Or the language you will use for this layout if you have many languages.
Click on this language to open up a few buttons which we’ll need in the next step.
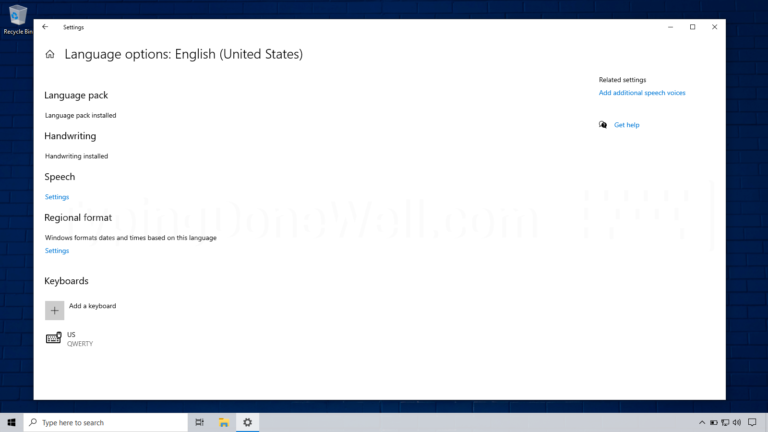
3. Click on “Options”
Now you need to click on the button that pops up. Of course, under the language, you want to use. Or just a language if you have one.
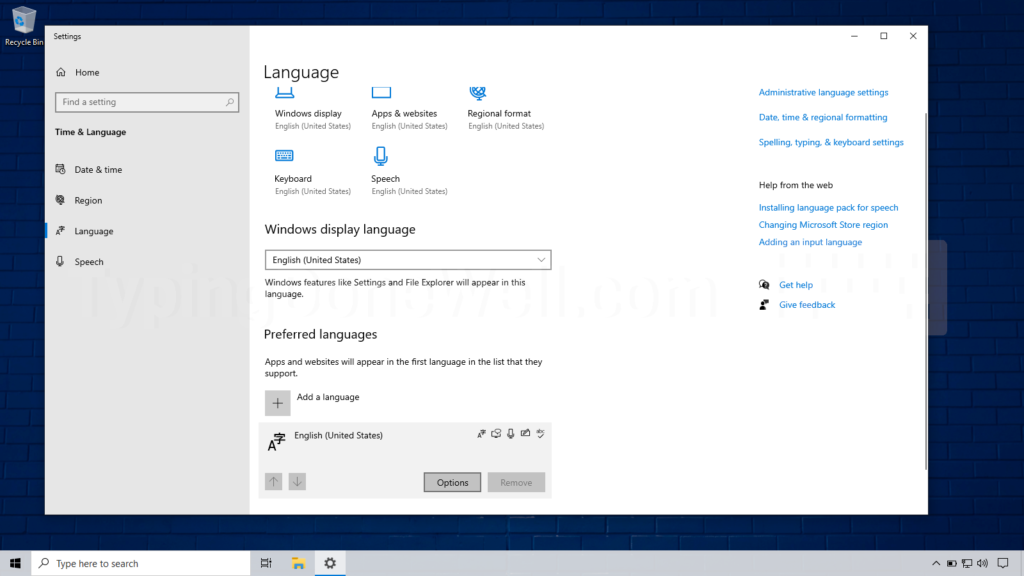
It doesn’t matter which language you choose. This doesn’t influence the layout that you can choose. You can have one language and a completely different layout that has nothing to do with it.
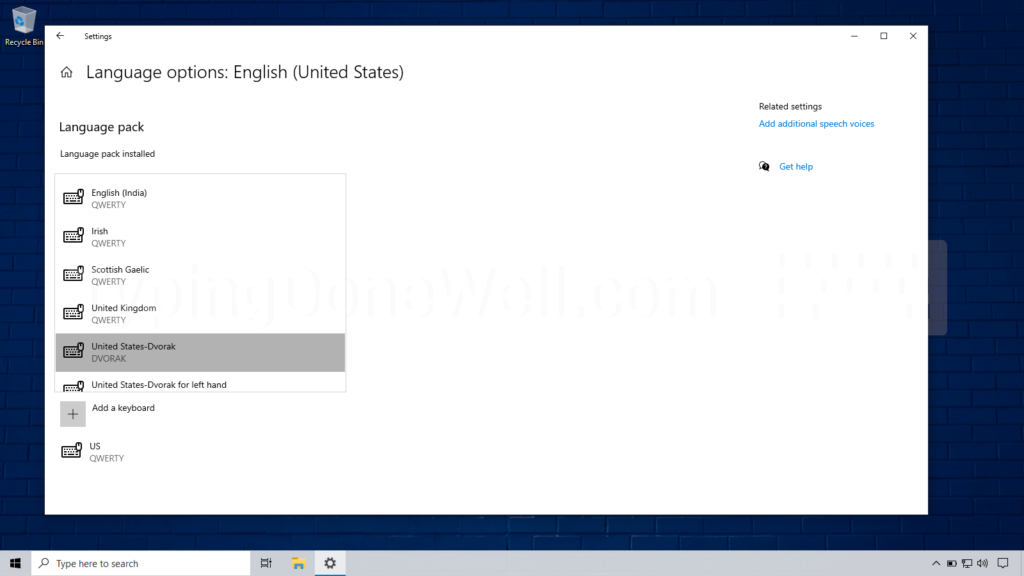
4. Click on “Add a keyboard” under the Keyboards section
You will see a big button with a plus on it and the description “Add a keyboard”. Click on this. It will open up a drop-down menu that you can scroll through.
5. Choose the layout you want to change to and click it
In the menu that popped up, you need to choose the layout you want to use. Scroll through this list and find the one you want to type with.
6. Delete the previous layout
This step is for people who don’t want to keep their previous layout. If you do want to keep it you will have two layouts at the same time. To quickly change between them you can use this shortcut: Windows Key + Space.
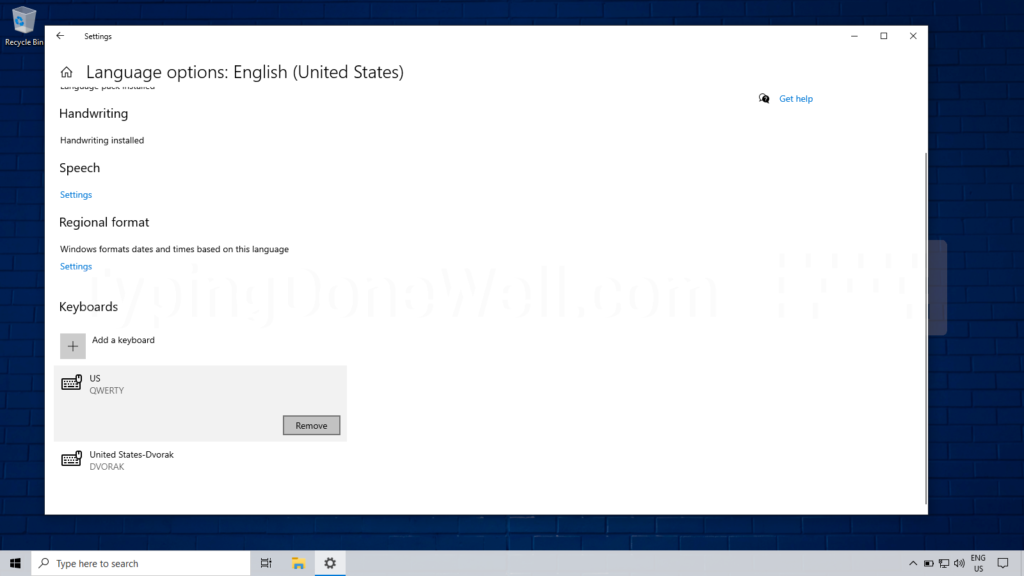
If you want to have just one layout (the one you added) then remove every other one. You can do this by clicking on the layout you want to delete (it will show you a button) and then pressing “Remove”.
How to change your keyboard layout on Windows 8?
You can change your keyboard layout under the “Keyboards” section. So a lot of this will be just like checking your layout. If you already know how to do it from the previous section of this article then you can skip stepping.
Before we start here’s a quick answer for you that you can use as a summary later on:
The keyboard layout in Windows 8 can be changed in many ways. The simplest one is to do it through the Settings app. You first need to search for “edit layout” and then open “Edit layout and keyboard options”. In your language options, you can change the layout under the “Keyboards” section.
And here’s a step-by-step guide for you:
1. Open Search
On Windows 8 this step can be annoying. To do this as intended you need to move your mouse cursor to the top right corner of the screen. Then a side menu should pop up, sometimes it doesn’t. When you see it you need to click on the search icon.
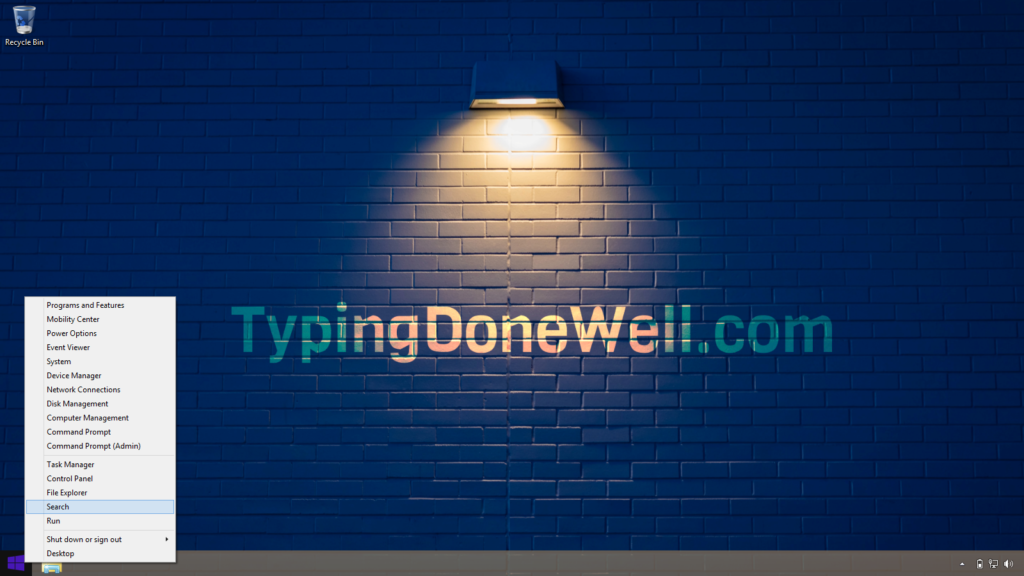
Or you can use a neat cheat. The other way to open Search is this: Click on Start with your right mouse button. Then in the list find “Search” and click it. This always works. It’s good to know if the first method becomes too annoying.
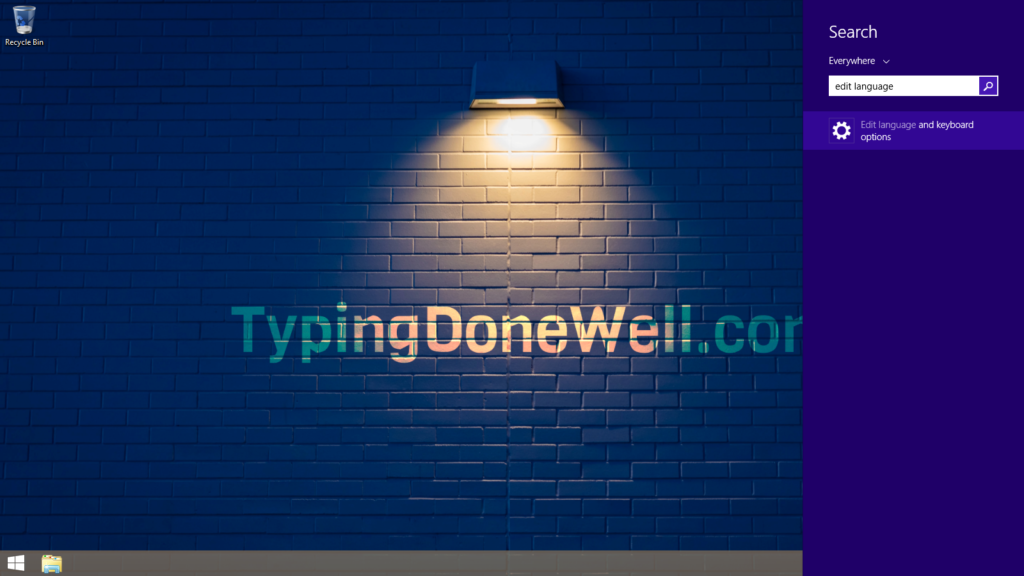
2. Search “edit language”
In the search type “edit language”. This will find you a proper setting that you need to open. That way you don’t need to find it manually through the Settings app.
This will take you directly to the setting category that we need to go to. It is a faster and easier way then going through settings or even control panel.
3. Open “Edit language and keyboard options”
This should be the first and actually only search result that you will get. Once you click it this will open up the Settings app on the right category and in the right setting. It’s faster to do this that way.
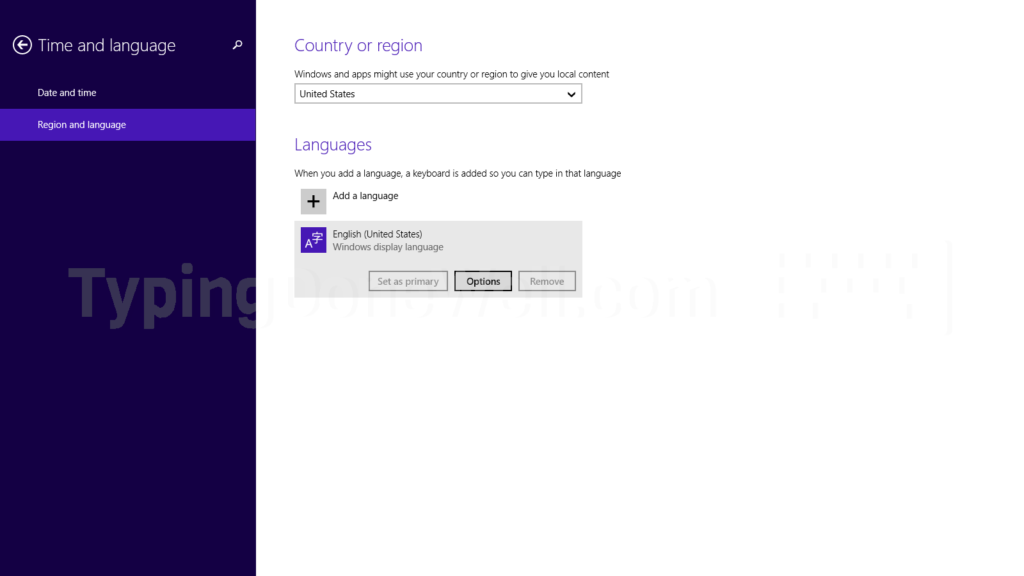
4. Click on your language
Once you already opened up the proper setting page you need to choose your language. Most people will only have one there. For them, the choice is very simple. If you have many languages choose the one you will be using this layout with.
5. Click on “Options” under your language
When you click on the language it will show you a few buttons. The only one we’re interested in is called “Options”. Click on this, it will take you further.
6. Click “Add a keyboard” under the “Keyboards” section
After you click “Options” it will take you to the next settings page. There at the top, you will see some handwriting settings. We don’t care about those. But below you will see a section called “Keyboards”.
There you can see all of your active layouts. You can also add a layout there. That’s what we want to do. Press “Add a keyboard” to add a new layout.
7. Choose a layout from the list and click it
Now you should see a list of different layouts. All of those are installed on your system. If you don’t find the layout you’re looking for – it’s not installed on Windows. You would need to manually install a custom layout. Today we’re not gonna talk about that.
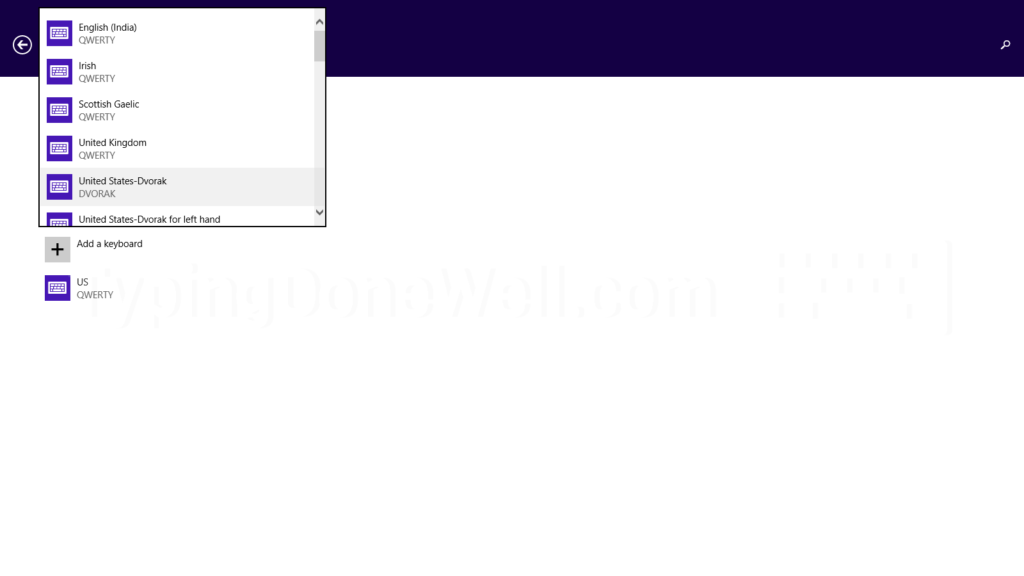
Once you choose your layout you need to click it. This will add to your active layouts.
8. Delete the previous layout
This step is something you need to decide on. If you don’t want to use the previous layout at all or if you want to leave it. You can remove it if you won’t need it anymore. Or you can leave it there and have two layouts active at the same time. You can quickly change between them with this shortcut: Windows Key + Space.
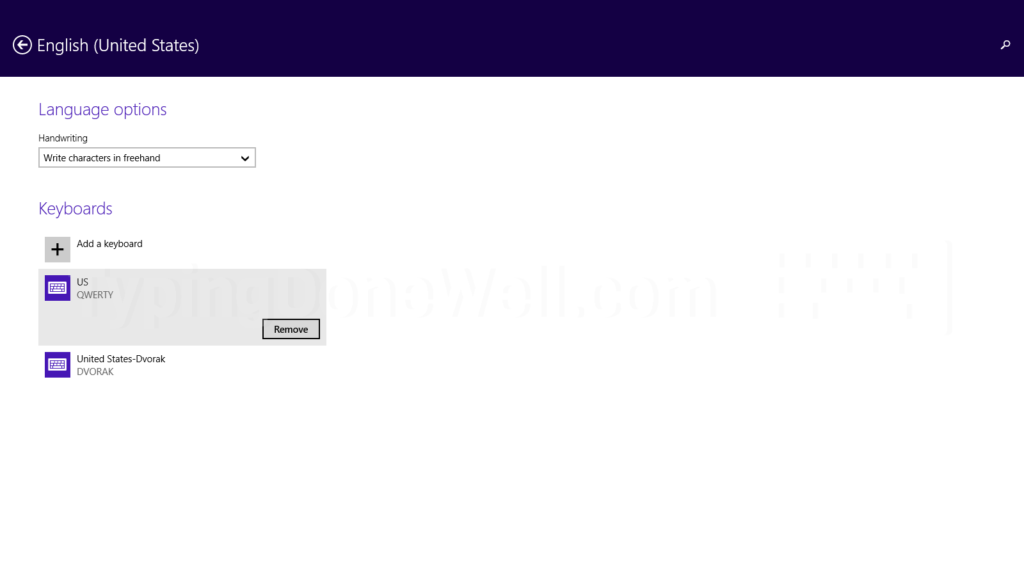
Here’s what you do if you want to delete your previous layout:
- Click on the layout you want to remove
- Click on the Remove button under this layout
And now you can enjoy your new keyboard layout!
How to change your keyboard layout on Windows 7?
Changing your layout on this operating system is a bit messier compared to others. But when you know how to do it you shouldn’t have any trouble at all. I will walk you through step by step just so you can learn to change your keyboard layout.
Once you do it will be fast and easy. You can change your layout in just a minute. Here’s how you do it:
The fastest way to change your layout in Windows 7 is through Search to directly open up the proper setting. It’s also easy so anybody can do it. You need to search „change keyboards” for the right setting and then add your layout. Finally, you need to change the default one and remove the previous layout (look at the guide).
Of course, I’m not going to just tell you to do this, this and there you go. It’s not really helpful. Here I will walk you through each step with photos so you can easily follow along:
1. Open up Start
The first thing you need to do is click on Start. If you don’t know which one it is – the one you press when you want to turn off your computer. It’s in the bottom left corner of the screen. You need to click on it.
2. Search „change keyboards”
Then type in the search box „change keyboards”. This will let you find the proper setting right away. Thanks to that you don’t need to open up Control Panel and manually go through several categories. It’s cleaner, easier and faster to search for the right setting directly.
3. Click on „Change keyboards and other input methods”
Once you type „change keyboards” in search you will get this result – „Change keyboards and other input methods”. It will probably be the first one you get. But it doesn’t matter where it shows up, just press it.
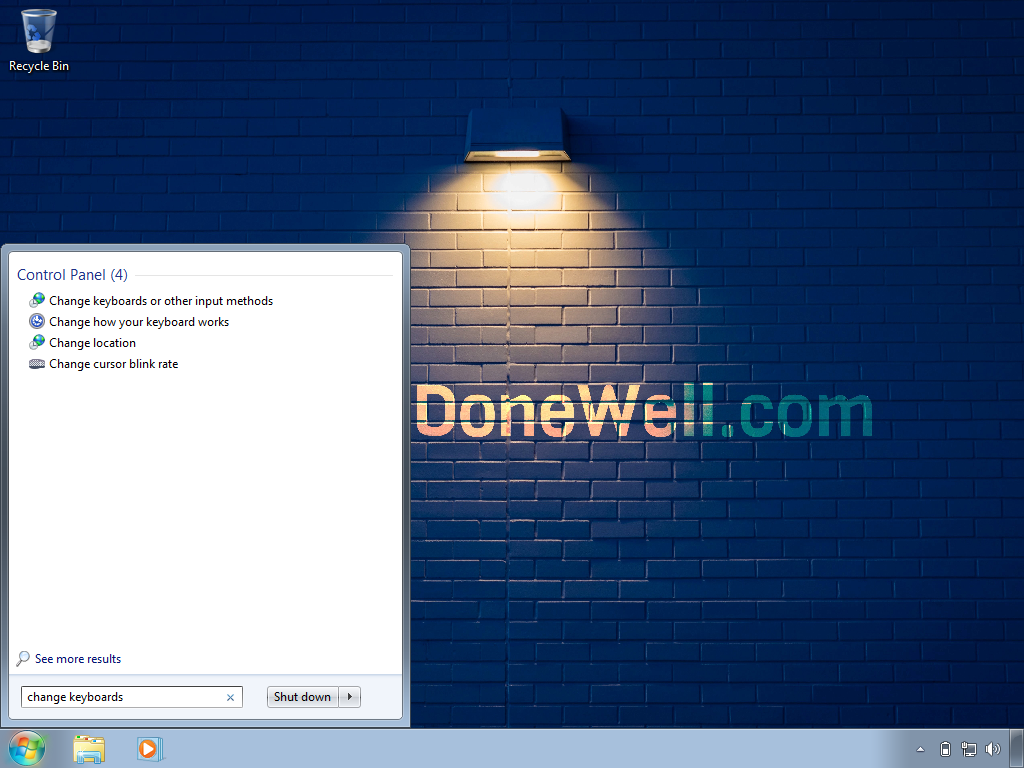
4. Click on „Keyboards…”
Now the new window will pop up. It’s still not quite there yet. Now you need to press the button called „Keyboards…” to open up more advanced settings where you can actually change your keyboard layout.
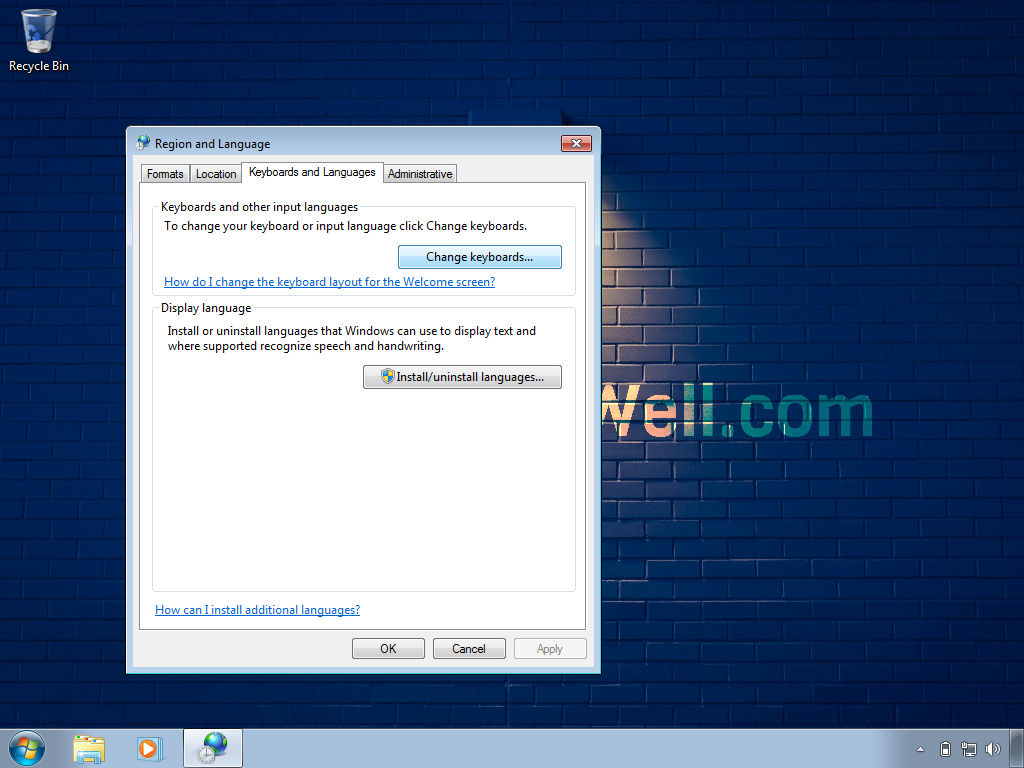
Here you can see your current layout. It’s under the „Default input language” section. I know, it’s not that intuitive. Well, that’s how it is there.
You can also see every layout that you have chosen there. It’s in the section called „Installed services”. You probably will have just one there. At least for now before we add the layout you want to use. You have to do this before you can change your default one.
5. Click on „Add…”
Now in order to change the layout for the one you want to use you first need to add it. The first step to do that is to click on the button called „Add…”. It’s on the right of the section with currently added layouts.
6. Choose the layout from the list
Once you click on the „Add…” button the list will show up. It contains all of the layouts that are installed on your system at the moment. This is more than most people need. But if you can’t find your layout there it means it’s not installed. You have to manually add it as a custom layout.
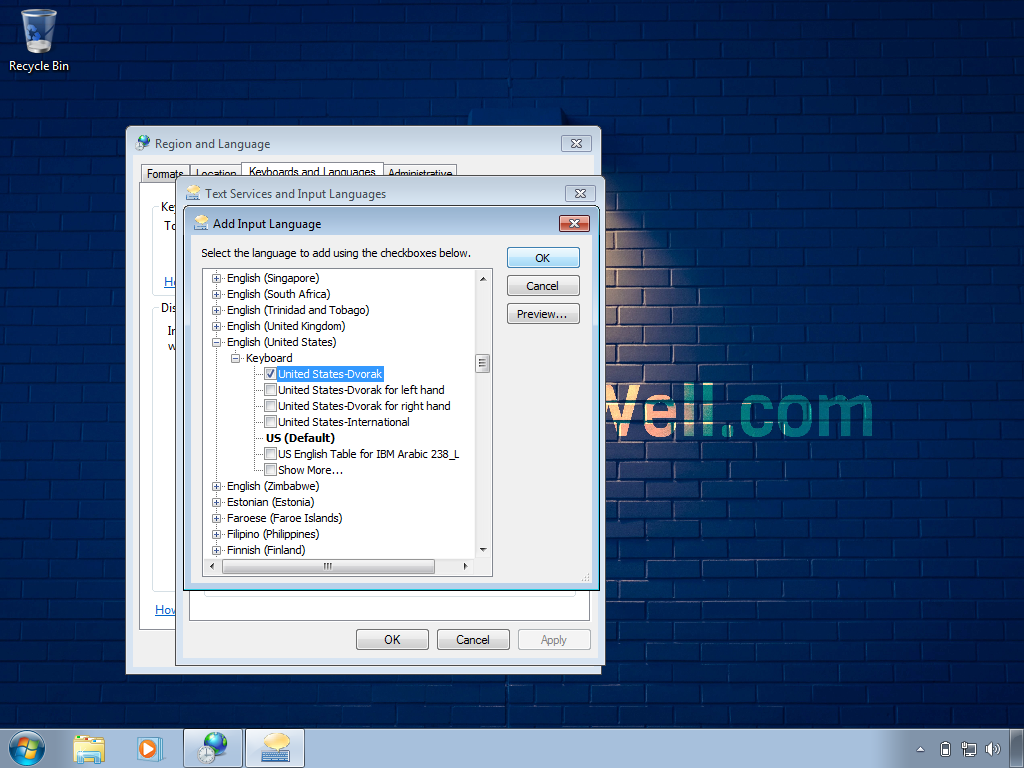
Here find the layout you want to use. Then click on it. That way you will select it and you can move to the next step.
7. Click „OK” to add highlighted layout
Now you just need to click the first button on the right called „OK”. This will add the layout you highlighted by clicking it in the previous step.
8. Change your default layout under „Default input language”
Once you already added your layout you need to actually choose it as the one to use. You can do that under the section called „Default input language”. There in the drop-down menu, you need to click on the layout you’ve just added.
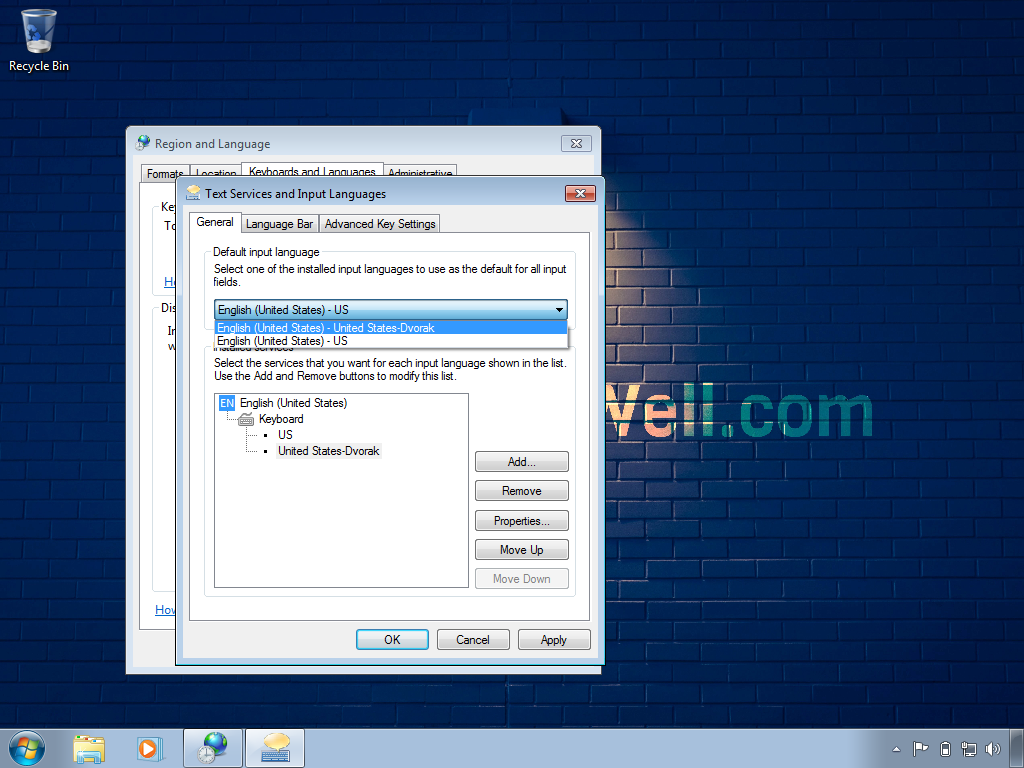
9. Delete the previous layout
This step is optional but it’s better to keep everything clean. After you add and change your layout you need to remove the previous one.
First, select the layout you want to delete in the section „Installed services”. Then click the button on the right side called „Remove”.
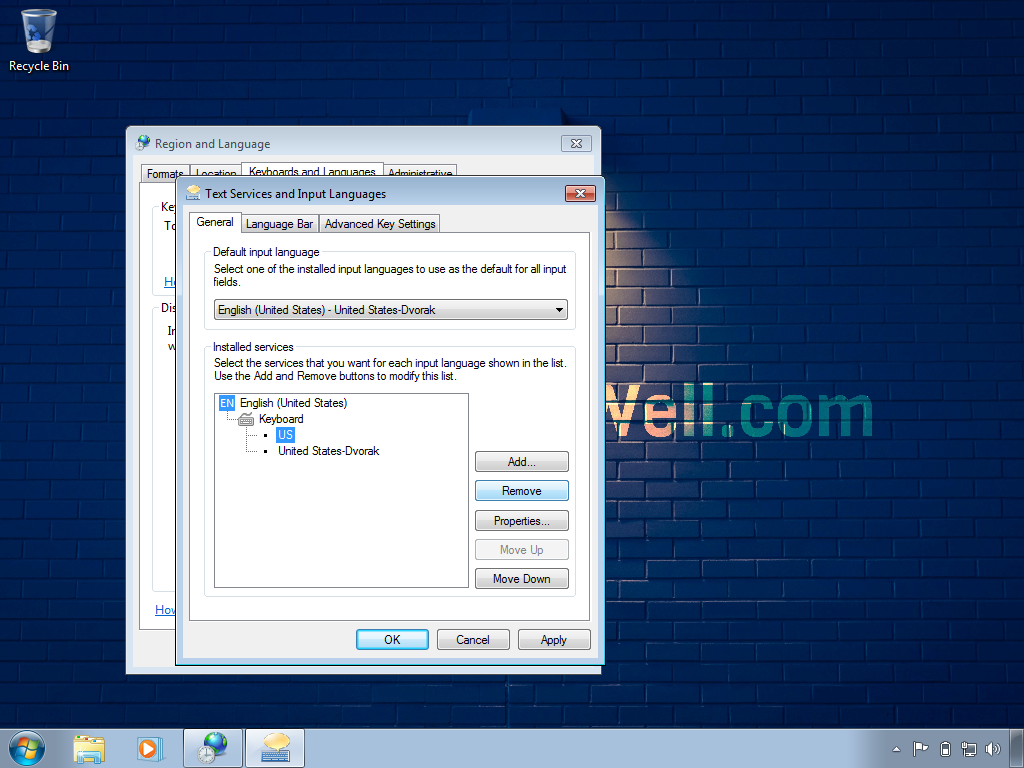
Then of course remember to hit „Apply”! Don’t just close the window but actually save the changes you did. Or all of that won’t do anything.
What to do if the layout keeps changing back?
This can be very annoying when it happens. And you will also experience it. If you never had trouble with Windows changing your layout into some other one you’re very lucky.
For some reason from time to time, Windows keeps changing the layout to something different. I don’t know why, maybe nobody knows. It’s just Windows.
Luckily once it happens it is easy to fix. All you need to do is delete the layout that Windows added. Or if it changed the layout completely you need to replace it.
You could in theory try to solve this issue for good. But for that, you need to know proper programming languages and be able to find this issue, come up with a solution and modify the system to fix it. It’s not worth it at all. Here’s what you need to do instead:
When Windows changes your layout completely or just adds a new layout you need to manually change it back to what it was. It happens from time to time and there’s no point in preventing it. You simply need to go to the proper setting and change your layout to the one you want (look at the layout changing guide).
That’s something that we have to live with. Maybe one day Microsoft will save this. But with their tempo, I wouldn’t count on that. They make everything way too complicated than it needs to be.
