The ultimate guide to properly lubing keyboard stabilizers (with videos)
Stabilizers – part of a keyboard that’s extremely important to its overall typing quality. It might seem like there shouldn’t be much of a difference, only a few keys have stabilizers. But one rattling spacebar can destroy the smooth feeling of a whole keyboard.
Stabilizers are those parts that make extra-long keys stay level when pressing them down. They can also be a cause for an unpleasant noise or rough feel.
Before you start lubing your stabilizers I recommend you check out the Holee mod. For a simple reason. If you lube your stabilizers and then decide to perform the Holee mod you’ll have to clean all off this lube. You can read about this mod here – ARTICLE HOLEE MOD
A mod that makes the biggest impact on the stabilizers’ performance and feel is lubing them. In this article, I will show you a detailed step-by-step process of how to do it yourself. You don’t need any experience, all you need is a bit of time to read and lube your stabilizers. Maybe a bit of patience too.
What tools do you need to lube keyboard stabilizers?
| Lube | For lubing stabilizers, you should use a thick lube because using a thinner one won’t work nearly as well. Krytox 205g0 is a perfect middle-ground. You can buy one here – BUY KRYTOX LUBE |
| Small brush | Preferably 00 or even 000 size. You can buy such brushes here – BUY SMALL BRUSHES |
| Keycap puller | You will need a keycap puller to get the keycaps out of your keyboard. You don’t need a fancy one. Here’s a good keycap puller that will serve you well – BUY A KEYCAP PULLER |
| Switch puller | In order to get the switches out of the PCB you’ll need this tool. You need it before you can take the stabilizers out. Here’s a switch puller that you can buy – BUY A SWITCH PULLER |
| Small screwdriver | You should have one at home. It doesn’t matter what brand or type you have, it doesn’t need to be electric. Just a small screwdriver. You can get one at your local hardware store. Or you can buy a whole precision set here – BUY SCREWDRIVER SET |
| Stabilizers | You need good stabilizers. I know it’s a bit obvious, but if you have crappy stabilizers, no amount of lube will save them. Better save yourself the frustration. You can buy good stabilizers here – BUY STABILIZERS |
To lube stabilizers you will need a small brush (size 00 or 000) and thick lube. You shouldn’t lube stabilizers using a thin lube. The industry standard which will work great is Krytox 205g0.
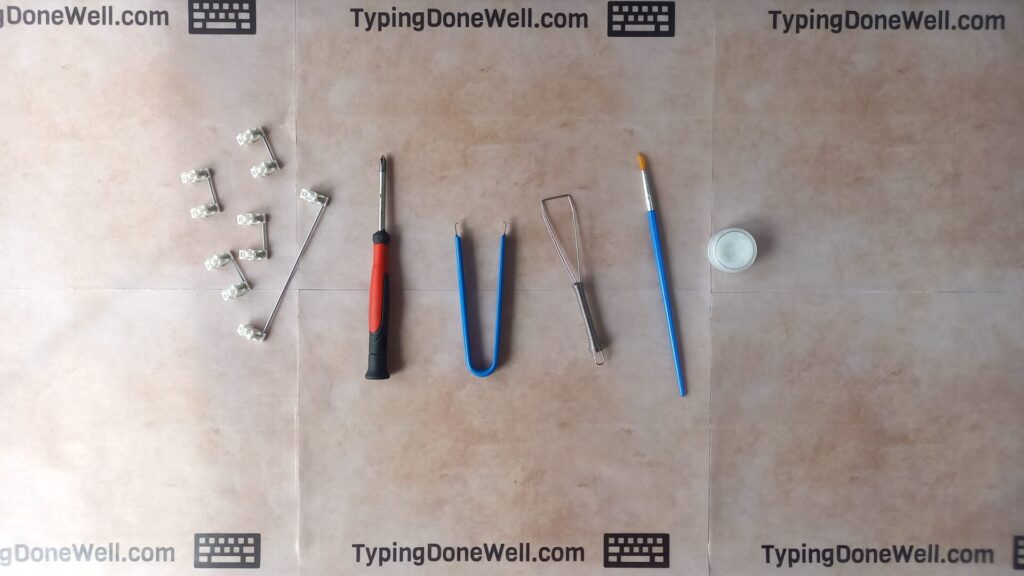
If you need to remove the stabilizers from the keyboard first you will need a keycap puller and a switch puller. You’ll also need a small screwdriver (size dependent on your exact keyboard’s screws).
Do keyboard stabilizers need to be lubed?
First, we need to talk about the whole purpose of lubing stabilizers. What is the reason why you would want to lube your keyboard’s stabilizers? Do they even need to be lubed?
Every mechanical keyboard stabilizer can be mounted and will work fine without any lube. However, lubing stabilizers has a great impact on their performance. It’s something worth doing for a better feel when typing and for the improved sound of your keyboard.
You don’t need to lube any stabilizers. But you can. And once you do you’ll see how much of a difference just a bit of lube does to stabilizers.
But those are just words. It’s a bit hard to picture how much a stabilizer can improve before doing it yourself. However, to show you the improvement in a better way, I’ve made a video. Here’s the difference between lubed and unlubed stabilizers:
As you can see, and hear, there’s a huge difference when you only lube your stabilizers. It can be a bit overwhelming at first but don’t worry. I will guide you through lubing your stabilizers step by step.
You don’t need any prior experience to get the benefits of this keyboard mod. I hope that you’re as excited as I am now that you see the difference that lubing your stabilizers makes!
What can I use to lube keyboard stabilizers?
Now that you know why it’s worth lubing your stabilizers you need something to lube them with. What specifically should you use to get the best result? What lube is best to lube your stabilizers with?
Lubing stabilizers requires a thick keyboard lube. Using a thinner one (like ones designed for clicky switches) won’t have such a good impact as thick lubes. The most reliable one that you can’t go wrong with is Krytox 205g0.
You can’t go wrong with Krytox 205g0. It’s widely available, cheap, and works very well. I recommend buying it, especially when you’re just starting out in the keyboard modding hobby.
Krytox 205g0 is often used by more advanced keyboard modders. It’s simply a good lube that fits most of the needs.
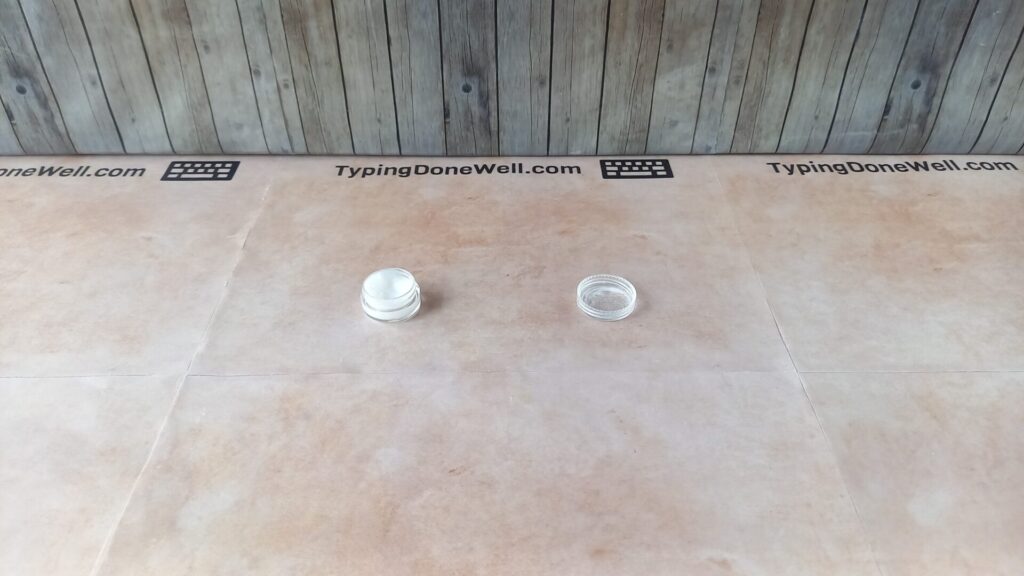
But for those of you who want more advanced reasoning – you need a thick lube. The thicker your lube is the more density it has. As a result, it will suppress the movement of metal wire in the stem removing the stabilizer noise.
However, if you go too thick or add too much lube stabilizers can feel laggy and unresponsive. You need to find a sweet spot. Using a thicker lube than Krytox 205g0 will require you to test stabilizers out yourself and find the proper amount of lube for different lube density.
Do stabilizers come pre-lubed?
If you’ve already lubed your switches (or wanted to do so) you probably know that there are some switches that come pre-lubed from the factory. You can buy those and save some time on the lubing process (although I think it’s pretty fun and you should do it at least once). You can read more about it in my article about lubing switches – ARTICLE HOW TO LUBE SWITCHES
Now, how does it work with stabilizers? Do they also come pre-lubed? It would make sense, right?
Keyboard stabilizers don’t come pre-lubed when you buy them. There are mechanical switches that come pre-lubed but stabilizers don’t. Luckily, it’s not hard to lube them yourself and it doesn’t take nearly as much time as lubing switches.
I’ve never bought pre-lubed stabilizers. Honestly, I never even heard of good pre-lubed stabilizers sold by the manufacturer. Lubing stabilizers is kind-off an experimental mod that’s meant to suppress the metal wire’s movement.
It would be really hard to sell factory-lubed stabilizers as the amount of lube differs even across different keycaps. And once you add switches into the equation it’s pretty much impossible to put the right amount of lube for every use case. That’s why stabilizers don’t come pre-lubed.
How to remove keyboard stabilizers from the board?
This section is for everyone who needs to remove the stabilizers from the keyboard before starting the lubing process. Taking stabilizers out of the keyboard is a bit complicated but I will show you step-by-step how to do it.
- First, you need to remove all of the keycaps from your keyboard using a keycap puller
- The next step is removing all the switches from the board. Your keyboard needs to be hot-swappable
I have a detailed article with videos about those two steps. You can learn all that’s important about removing keycaps and switches here – ARTICLE DISASSEMBLE KEYBOARD
- The third thing that you need to do is unscrew your keyboard’s plate from the bottom case. Then you’ll need to separate PCB from the plate by unscrewing it.
This step will be a bit different for every keyboard. The idea and general process will be the same however you might have one screw less or more on your keyboard.
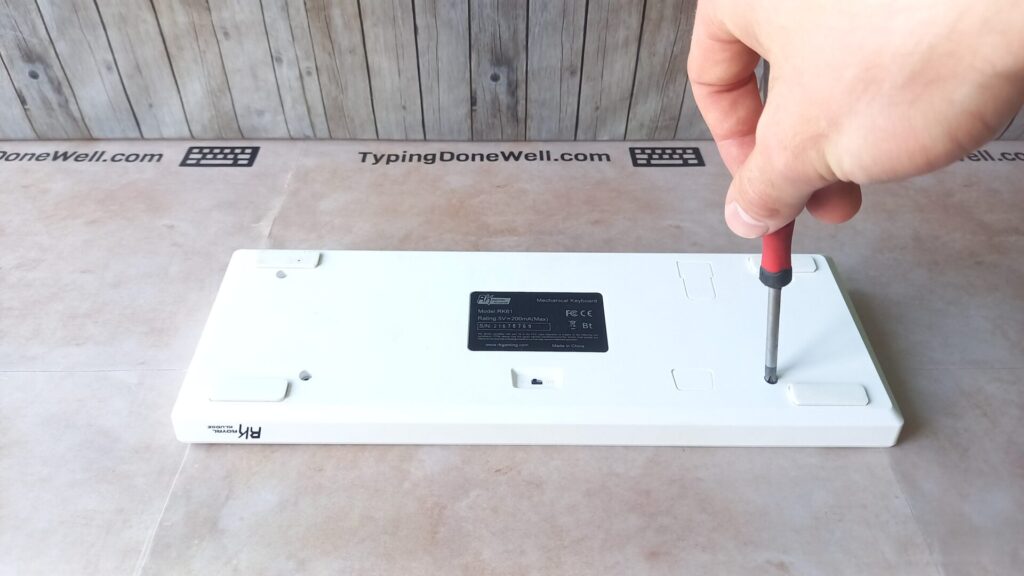
For this step, you will need a screwdriver. A regular one that’s quite small will be just fine. There’s no need for any fancy electric tools, just an old regular screwdriver is all you need.
Once you unscrew the plate from your keyboard’s case carefully remove it out of the case. There’s a high chance that it will be connected to a battery or a smaller circuit with a USB-c connector. You need to gently disconnect all the wires from your PCB.
Finally, you need to unscrew the PCB from the plate. This will separate those two parts. You can put your keyboard’s PCB in a safe place, we don’t need it for now.
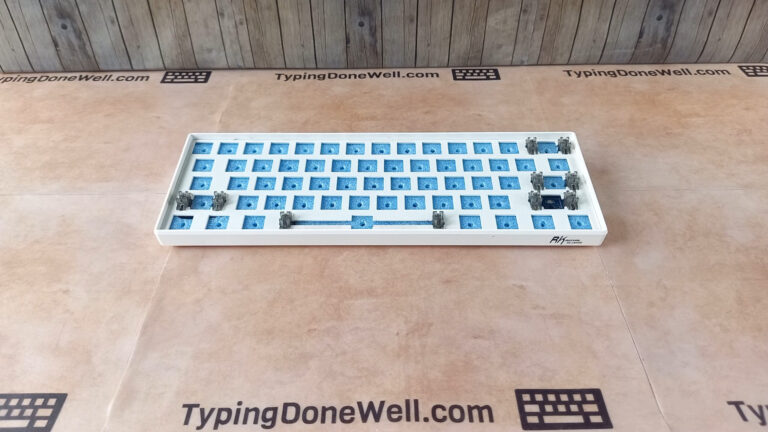
Now you should be left with a plate that has stabilizers in it. That’s the case for every keyboard with plate-mounted stabilizers. Now all that’s left to do is take stabilizers out of the plate.
Removing those from the plate can be quite tricky, especially if you don’t know the exact way to do it. But that’s what I’m here for!
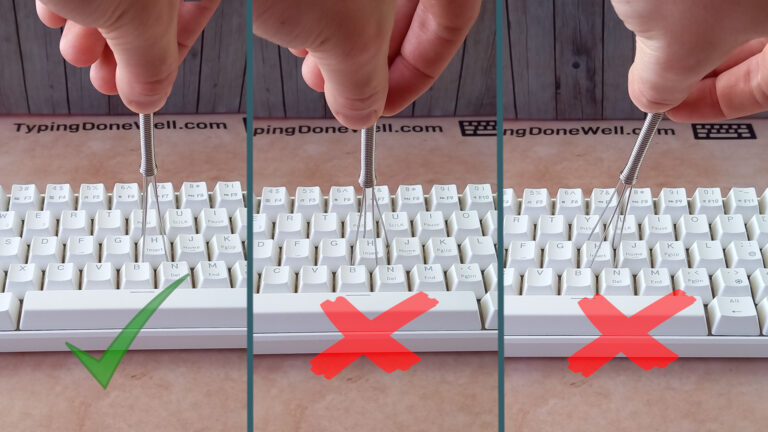
First, locate a small clip in your stabilizer. You need to simultaneously press this clip (with tweezers for example) and push the stabilizer out in the direction of this clip. It will be way easier for you to see on the video that I took:
Now, after all those steps you have your stabilizers ready for lubing. In order to piece everything back together you simply backtrack your steps.
If you have trouble doing that on your own let me know in the comments. I can make an addition to this article that will show you how to piece your keyboard back together after taking stabilizers out of it.
How to open and disassemble keyboard stabilizers?
Before we start lubing stabilizers it’s important to learn and remember the way to open and disassemble them. It’s also crucial to know how to reassemble keyboard stabilizers but I’ll show you that in the next section of this article.
First, let’s learn how to disassemble keyboard stabilizers. In reality, it’s pretty easy to do. You need to find the place where the metal wire connects with the stabilizer housing. Then you need to twist it upwards and get it out of the plastic clip.
To disassemble the keyboard stabilizer locate the place where the metal wire meets the stabilizer housing. Move the wire upwards to unclip it from the housing. Then remove the metal wire from the stabilizer stem. After that, all the parts will fall out on their own.
It can be hard to picture it yourself. That’s why I’ve made a video showcasing the exact way to disassemble a keyboard stabilizer:
As you can see all that you need to do is unclip the metal wire on both ends. Pretty easy, right?
Just be careful not to lose any parts. Once you unclip the metal wire there will be nothing holding the stabilizer stem and housing together. The stem will fall out immediately.
How to assemble keyboard stabilizers?
At this point, you already know how to open and disassemble keyboard stabilizers. Now you need to learn how to assemble them back together. That’s a bit more complicated. It requires the right alignment for the stabilizers to work properly.
First, take the metal wire and put it in front of you facing away from you. Then take both stabilizer housings and place them with the sticking-out part facing you. Finally, place the stabilizer stems in such a way that the two holes are facing you.
That’s the alignment that you need to keep while assembling stabilizers. Here’s a photo that I took to help you see it better:
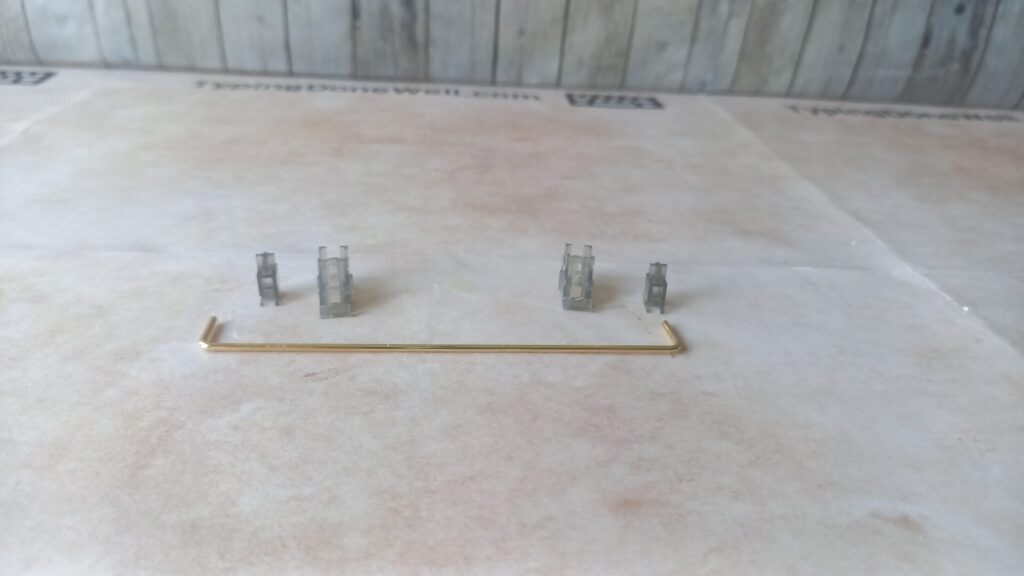
Then all that’s left to do is assemble your stabilizers. That’s how you do it:
To assemble keyboard stabilizers you need to keep the proper alignment (like in the photo). First place stems inside housings. Then slide the metal wire into the lower hole in the stabilizer stem. Finally, you need to clip the metal wire to the housing by pressing it down.
While keeping the alignment you place the stem into the housing. You need to have the housing’s sticking out part facing you and the stem’s two holes facing you. Then you put the metal wire into the stem and clip it in.
I made a video to show you exactly how to assemble stabilizers. It will be easier for you to understand if you can see it:
It’s pretty simple once you know how to do it. A keyboard switch is actually more complex, the stabilizer has only 3 parts (5 if you count each housing and stem separately).
How to lube stabilizers?
Once you know how to disassemble and then reassemble keyboard stabilizers you can finally start lubing them. For that mod, you’ll need to have those stabilizers removed completely from the keyboard.
The first step is to disassemble them. I’ve already shown you how to do this in this article. However, if you skipped this instruction or you want a bit of guidance while disassembling stabilizers you can read it just above – HOW TO DISASSEMBLE STABILIZERS
Once you finish breaking down stabilizers you’ll have one metal wire, two housing, and two stabilizer stems. I’ll guide you through lubing each one of those parts separately. It will be easier to understand everything that way.
How to lube stabilizer housing?
The first thing that you need to do is lube stabilizer housing. It’s a pretty easy job to do. Just make sure that you take only a small amount of lube.
Place a small amount of lube on the brush and distribute it evenly on both (bigger) sides of the stabilizer housing. You don’t need to lube too high and you don’t need to be careful of other sides. If you lube all four of them nothing bad will happen.
It’s a bit easier than lubing the tactile switch’s stem. With stabilizer housing, you need to lube two bigger sides. If you accidentally lube all four it’ll all be just fine.
Here’s a video that I’ve made for you. It’s way easier to see the proper way of lubing stabilizer housing on it:
That’s it. You don’t need to lube the stem. That’s because stabilizers (in stock) have a lot of side-to-side movement. As a result, they don’t need a lot of lube between the housing and the stem.
However, if you want to you can lube the stem as well. It will make the stabilizers feel more mushy and less responsive. It all depends on what you’re going for. But, typically, you don’t want to put too much lube on the housing.
How to lube stabilizer metal wire?
When it comes to the metal wire – that’s the perpetrator of the most annoying keyboard sound. The stabilizer metal wire is the reason for the stabilizer rattle. You can hear it in the video that I made comparing stock and lubed stabilizers. Here’s a quick link to this part of the article – STOCK VS LUBED STABILIZERS
Well, to be exact it’s the metal wire hitting the inside of the stabilizer stem that makes this horrible rattle. The whole purpose of lubing the metal wire’s ends is to create a dampening for this movement and get rid of the stabilizer rattle.
For this dampening to work, you need a thick lube. That’s the reason why thinner lubes won’t work with stabilizers.
To lube the stabilizer metal wire told it on one end and very generously lube the other end. Here you can add plenty of lube, it would be hard to over-lube this part of the stabilizer. Make sure to add lube to the whole bending and even a bit before it for better metal wire movement.
Here’s the part where you can put as much lube as will stay on this metal wire. Literally, you can (and should) go nuts with the amount of lube. Here’s what it should look like:
Just have the stem inside the housing ready so you can place the metal wire inside it immediately after lubing. There’s no easy way to store lubed metal wire if you don’t assemble it right away.
How to lube keyboard stabilizers?
You already know everything that you need in order to lube stabilizers yourself. Now’s the time to join everything together and make your stabilizers perform way better and sound great!
Before you start lubing keyboard stabilizers you need to learn how to disassemble and reassemble them. First, you need to lube the stabilizer housing with a small amount of lube (preferably Krytox 205g0). Then generously lube the metal wire’s end and assemble the stabilizer with the proper alignment.
Sounds complicated but you already know all of those steps. If you have trouble with any of them you can just go back to the adequate section in this article.
Finally, I made a video of the whole lubing process just to make it easier for you to see:
Congratulations! Now you have lubed keyboard stabilizers. All there’s left to do is place them back into the plate or the PCB and enjoy better performance and great sound!
How often do you need to lube keyboard stabilizers?
You’ve lubed your stabilizers but you’re wondering how long will it last? Do you need to re-lube them every now and then to keep the performance great?
You should never need to take the stabilizers out of the keyboard and re-lube them completely. The only thing that might need attention is the amount of lube inside the stabilizer stem. Luckily, you can add lube without taking apart the keyboard.
Yes, with stabilizers you might discover one day that the rattle is slowly coming back. Of course, it won’t happen any time soon after lubing them for the first time. However, you might need to add a bit of lube later down the road.
That’s mostly the case for stabilizers that are lubed without any other mods. Holee mod, for example, gets rid of the stabilizer rattle more reliably. You can read more about that mod here – ARTICLE HOLEE MOD
Still, most of the time you won’t need to change. But if you need to re-lube them, don’t worry. Sometimes it happens no matter how well you lubed your stabilizers. Just repeat the process or look at more advanced mods like the Holee mod.
Even with all those important steps I don’t want you to worry too much. Simply start lubing your stabilizers following all of my instructions one step at a time.
With all that said I hope you found value in this article. I’ve put quite some time, especially into those videos to make it easier for you to see everything. I wish you a fun time lubing your stabilizers and great results! Let me know how it went in the comments down below!

