What keyboard layout are you using? – a guide to check it on Windows
Sometimes it happens that you press one key and for some reason, the other one registers. Then you press it again and you are surprised because it happens a second time. Now you think that your keyboard is broken.
But it’s might be just a different layout. Windows even itself can change the layout to some factory setting. Luckily it’s easy to check which one you are currently using on your computer.
This article is just about checking your keyboard layout. If you want to see a guide on how to change your layout I also made it. The article is here if you need it – ARTICLE HOW TO CHANGE LAYOUT
How to check your keyboard layout on Windows 10?
There are many ways you can do this. You might find some advanced ways on the internet like using Command Prompt to do this. We’re not gonna do things like that here. I will show you the easiest method to check your layout.
Just so you know what to expect in this section I will give you the answer up front. Then later I will dive into more detail about each method.
There are many ways to check your keyboard layout on Windows 10. The simplest one is through reading your layout from the Settings app under language options (look at the guide). It’s easy to do so it’s great for people without advanced computer skills.
I’m sure you will be able to do this with no trouble. Especially as I walk you through this:
1. Open Settings
First thing that you need to do is open Settings. The easiest way to do that is by searching settings in the start menu.
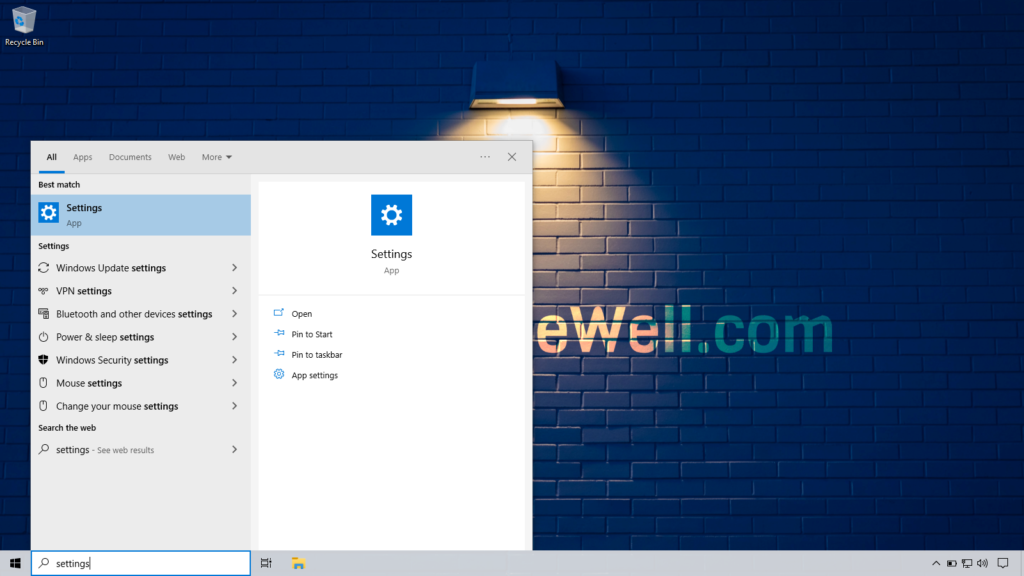
Click on Start and then on search. Now you need to type “settings” and there you will have it. Click on the application.
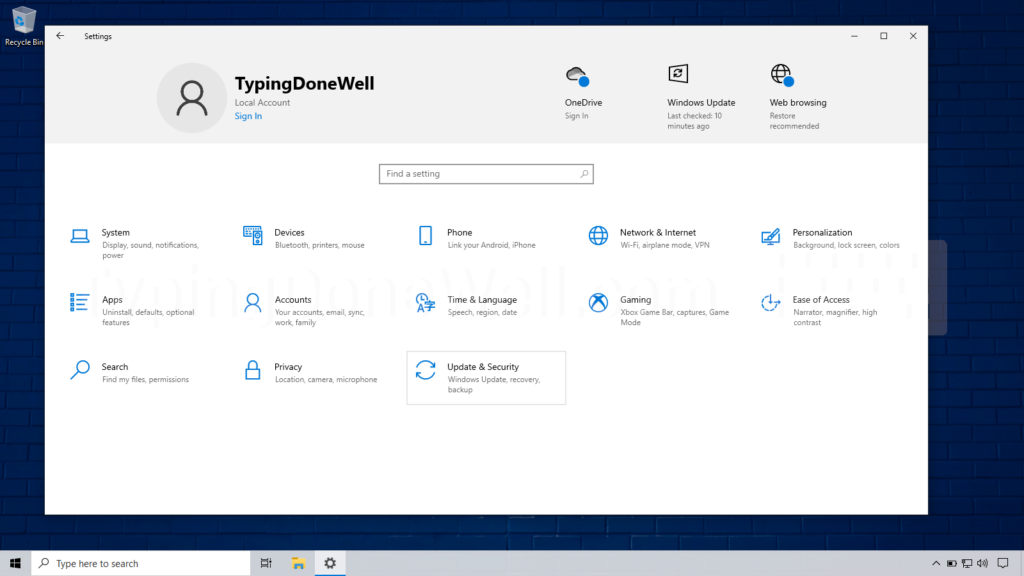
2. Go to “Time & Language”
Once you open up the Settings app you need to select the right category. Click on the “Time & Language” section. There you will be able to see your keyboard layout.
3. Click on the Language tab
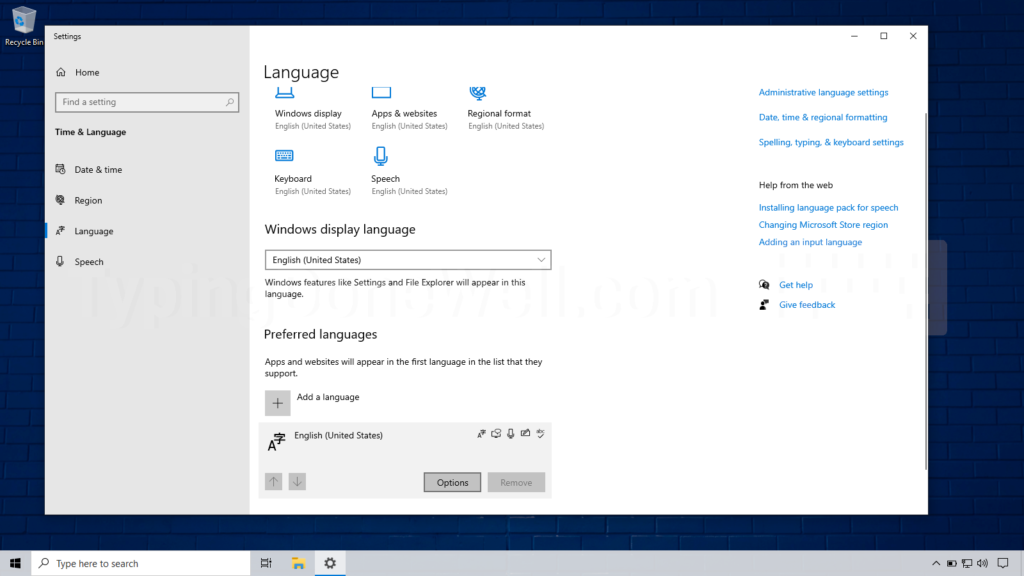
On the left, you will see a menu. There will be three tabs – Region, Language, and Speech. Click on Language. This will take you to the next section.
4. There choose the language you are using and click on it
Most of the people will only have one language there. But if you have a few choose the one you use when typing in that layout. If you only have one then simply click it.
5. Click on language options
Once you click on your language you will see a few buttons pop up. What you need to find is “Options”. Click this and it will take you further.
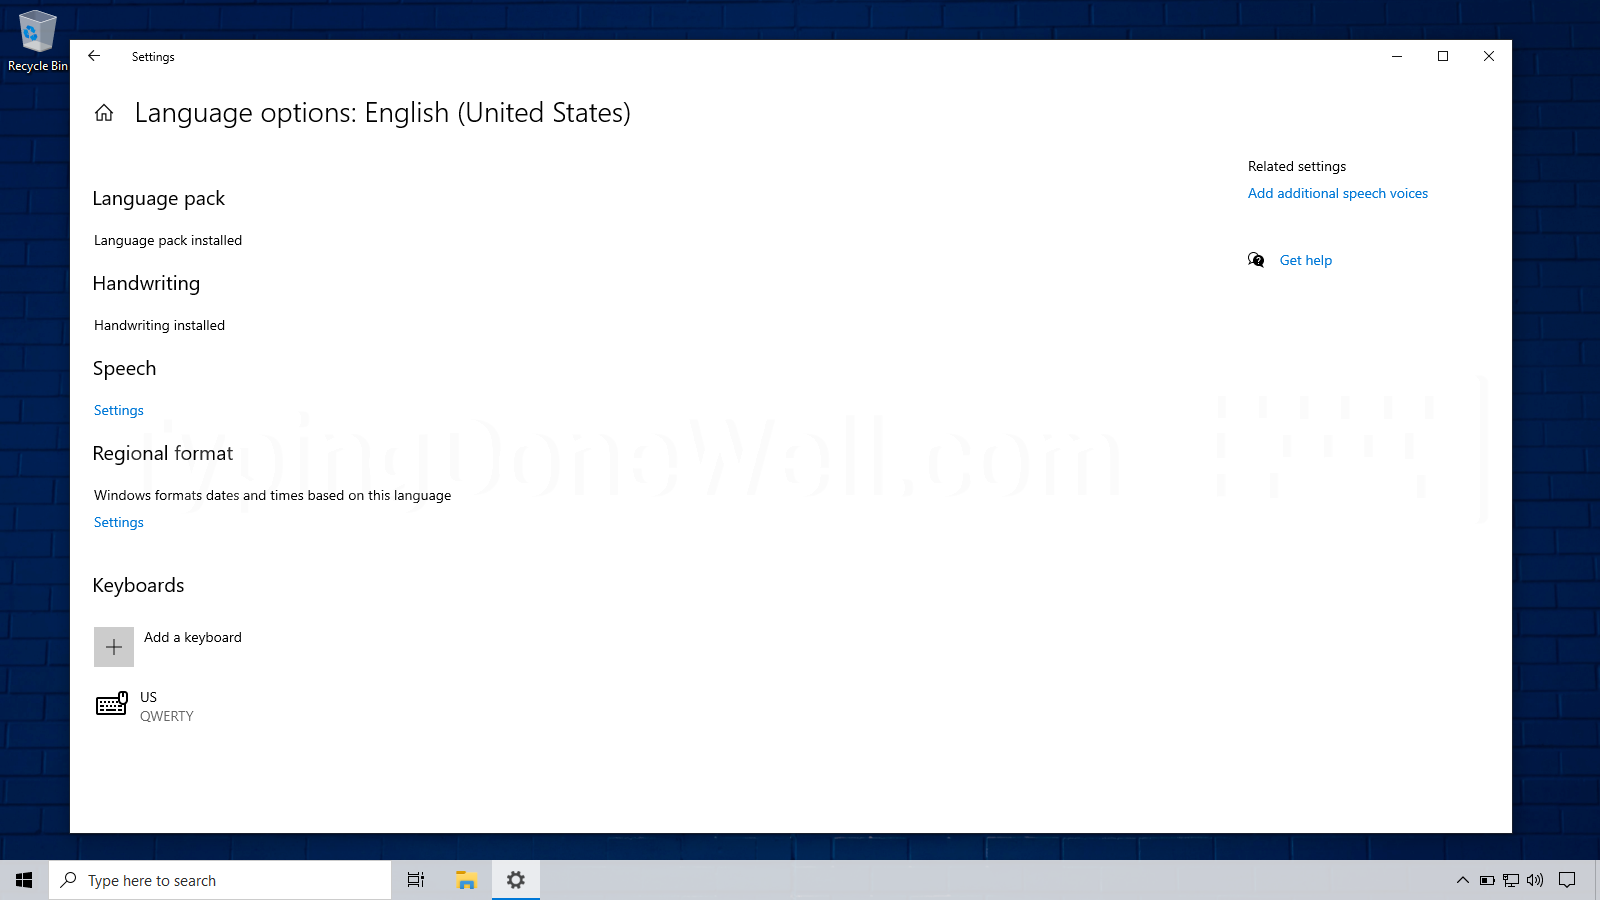
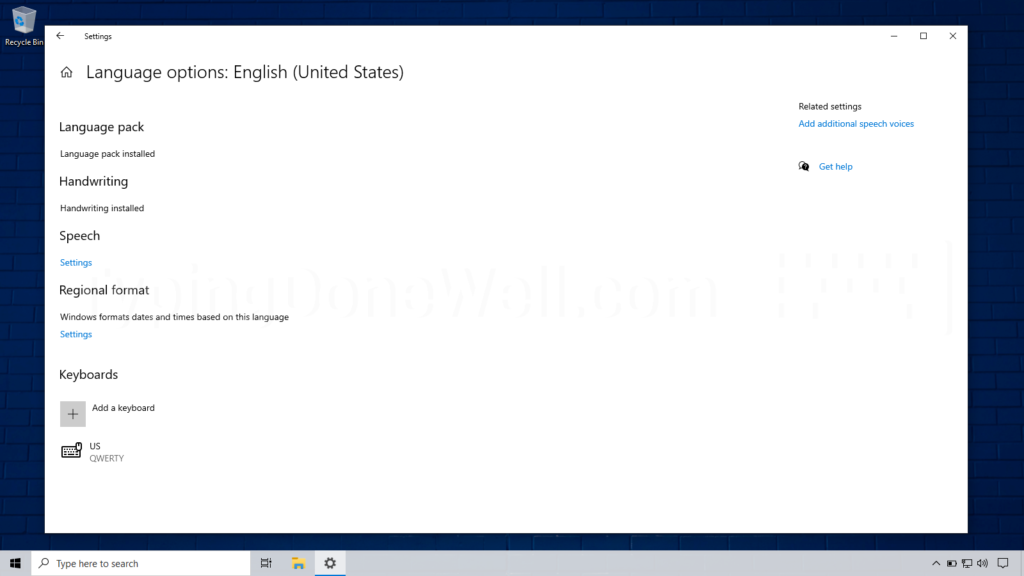
6. Check your current layout under the “Keyboards” section
Here you can finally check your keyboard layout. Not only the one you’re currently using. Also, every other that you choose as a second and third.
How to check your keyboard layout on Windows 8?
This process is very similar to Windows 10. The major difference is where you can find the Settings app. This system has a unique way of searching for apps. And honestly, it can be quite annoying. At least from my experience.
So today I will show you a way to kind of bypass this annoyingness and get straight into the setting we are looking for.
Here’s how you check your keyboard layout in short:
There’s not just one way to check your keyboard layout on Windows 8. However, the easiest way is through the Settings app. To check your layout that way you need to go to the proper setting, click on your language’s options, and then look at the layout under the “Keyboards” section.
Now I will walk you through doing what I just said but step by step with photos:
1. Open Search
You can do this two ways. You can place your cursor in the top right corner and then click on the search icon. This is the more annoying way of doing this. It doesn’t always work.
You can also open a search that way: Click on the Start button with the right mouse button, in the list find “Search” and click on it. This is way more reliable and can save you some frustration.
2. Search “edit language”
This is what you need to type in order to directly find the proper setting. Just type this phrase into the search.
3. Click on “Edit language and keyboard options”
After you search “edit language” you should get a setting called “Edit language and keyboard options”. That’s what you’re looking for.
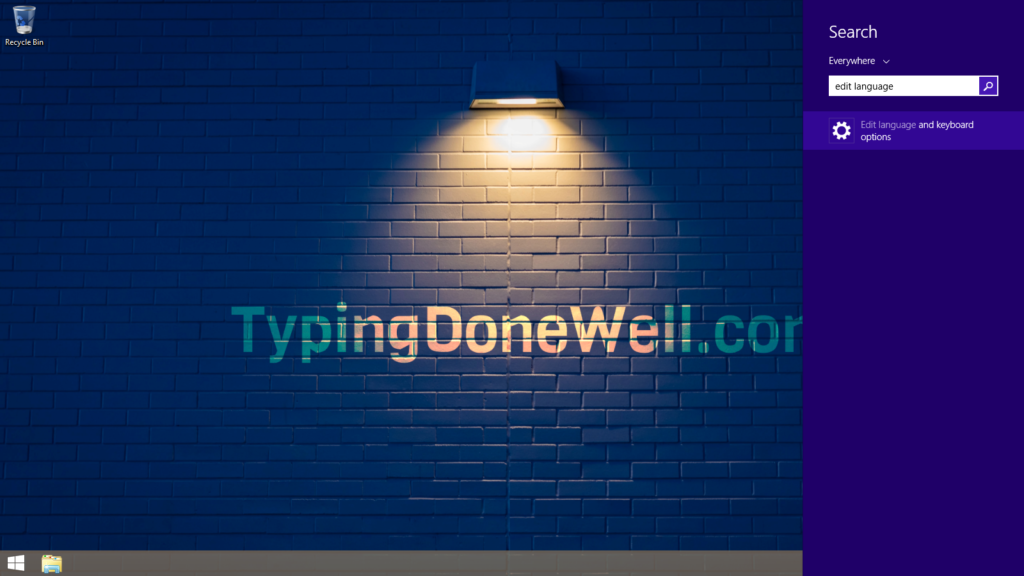
Click on that search result. It will get you to the proper category in the Settings app that you need to go to.
4. Click on your language
Here you can see many languages if you have them installed. Most people will just see one. If you have a few of them choose the one you want to change the layout for. If you have only one then click this one language.
5. Click on “Options” under your language
You should see a few buttons under your language. The only one we need is the button called “Options”. Click it.
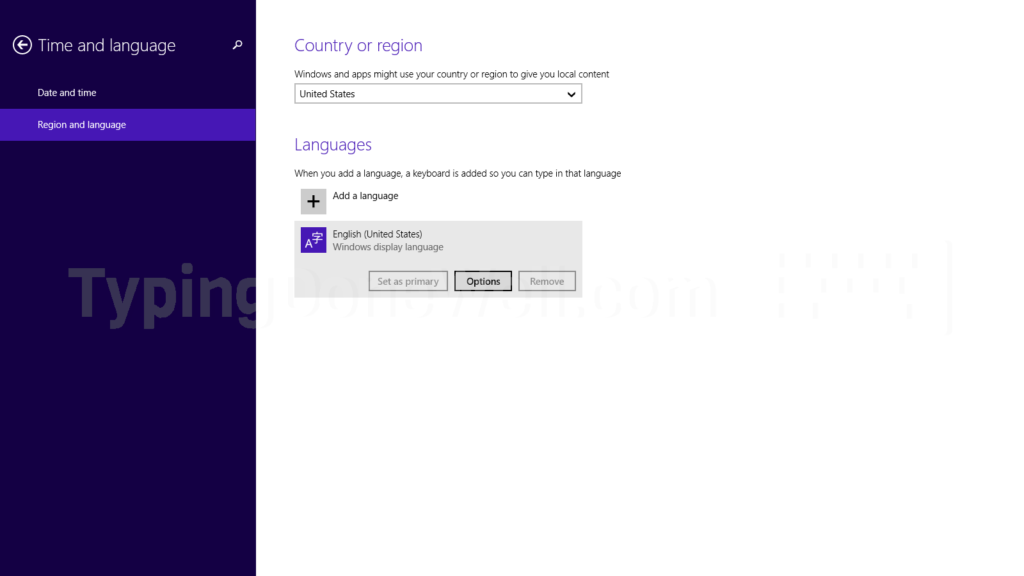
6. Check your layout under the “Keyboards” section
On the next window, you will see some Handwriting settings (which we skip) and a section called “Keyboards”. That is where you can see each one of your layouts.
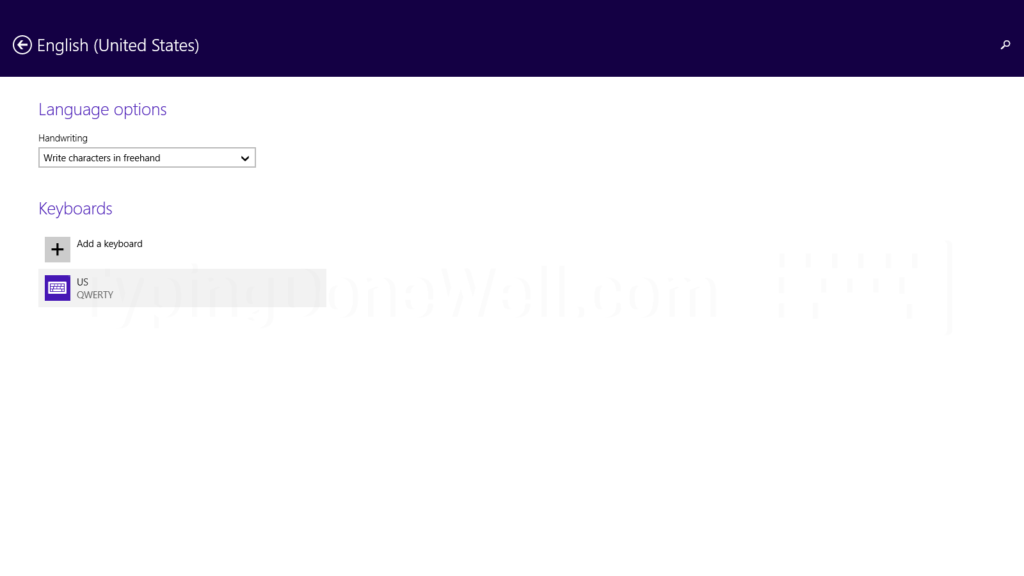
You can have many layouts installed on your pc. Then you can choose from them. In the “Keyboards” section you will see every layout that you choose. You can quickly change them by pressing Windows Key + Space.
How to check your keyboard layout on Windows 7?
It’s a bit harder to check your layout in Windows 7. But still, anyone can do it once you know how. I will show you step by step a way to not only check your current keyboard layout but also everyone’s active.
The easiest way to check your keyboard layout on Windows 7 is through search, not by Control Panel. You need to search „change keyboards” and click „Change keyboards and input methods”. Then you can see your keyboard layout in Keyboards settings (if it sounds complicated check step by step guide).
Yes, this sounds complicated. But don’t worry, I will take you to step by step and show you how to do this:
1. Click on Start
The first thing you need to do is click on Start. It’s where you always click when you want to turn off your computer – the bottom left corner of the screen.
2. Search „change keyboards”
In the search box type „change keyboards”. This will let you find the setting we are looking for directly without the need to click through Control Panel. It’s way faster and easier that way.
3. Click on „Change keyboards and input methods”
Here you should get a result which is called „Change keyboard and input methods”. You need to open this setting by clicking on the result.
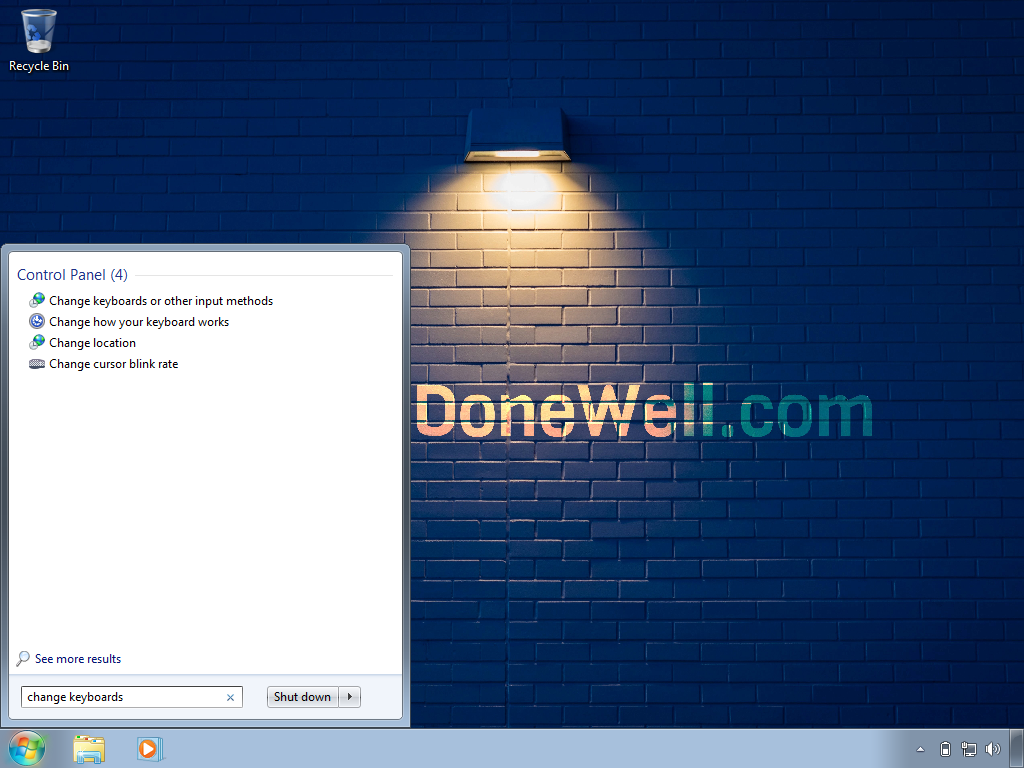
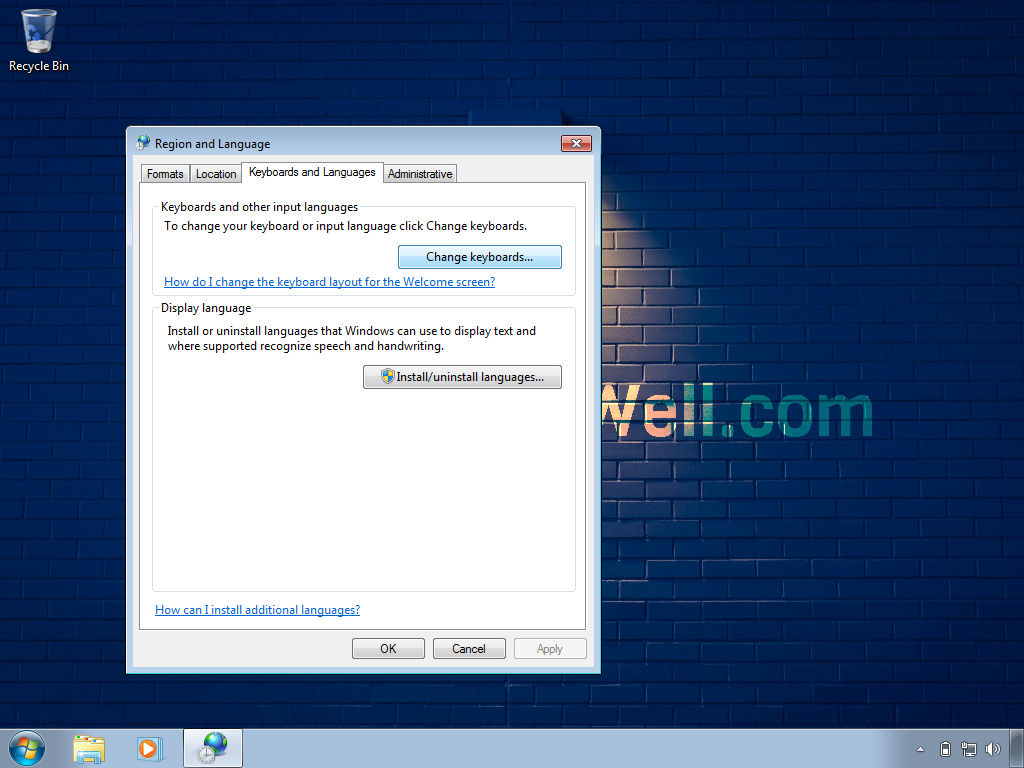
4. Click on „Change keyboards…”
Now you should have a proper settings window opened. Now what you need to do is click on a button called „Change keyboards…”. There you will be able to actually check your current layout and every installed one.
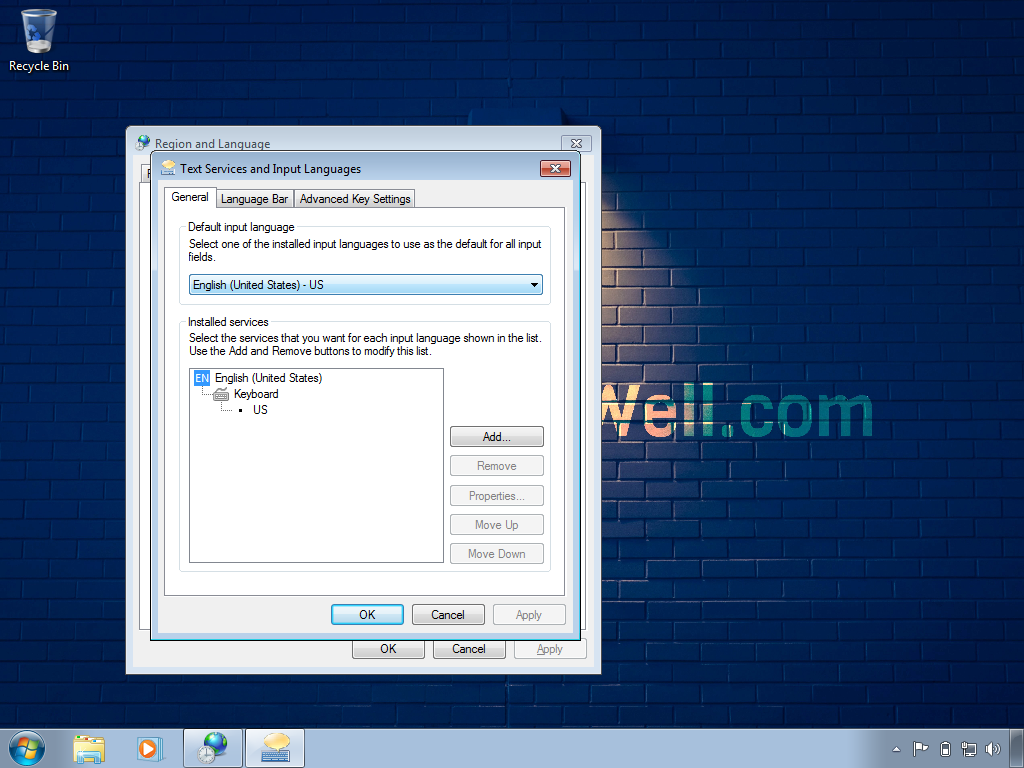
5. Check your default keyboard layout and the ones installed
Finally, you get to the point where you can see your layout. It’s under the „Default input language” section (in the drop-down menu). It’s not the most intuitive thing – the layout is under input language. But that’s how it is.
That’s how to check your layout on Windows 7. If you want to change your layout I made a whole step-by-step guide for that. You can read it here – ARTICLE HOW TO CHANGE LAYOUT WINDOWS
