How to disassemble and reassemble your keyboard? – beginner’s guide for modding
Let’s say you want to upgrade your keyboard. Do some clever mods to make it sound and feel better. Like a premium one. There’s one thing that you need to learn in order to do pretty much any mod – how to disassemble and reassemble your keyboard.
There are a lot of keyboards and some of them are different to disassemble than the others. However, the general idea stays the same. You might only have a few more foams in your keyboard (if it’s a more expensive one). Always keep track of your parts. So that you’ll know where each unique foam is supposed to go.
I’ve made this guide to help all the beginners out there. Once you learn this basic structure of both disassembly you’ll be able to work on pretty much any keyboard out there. You simply add a few elements. Like foam. The fundamental structure stays the same.
What tools will you need to disassemble your keyboard?
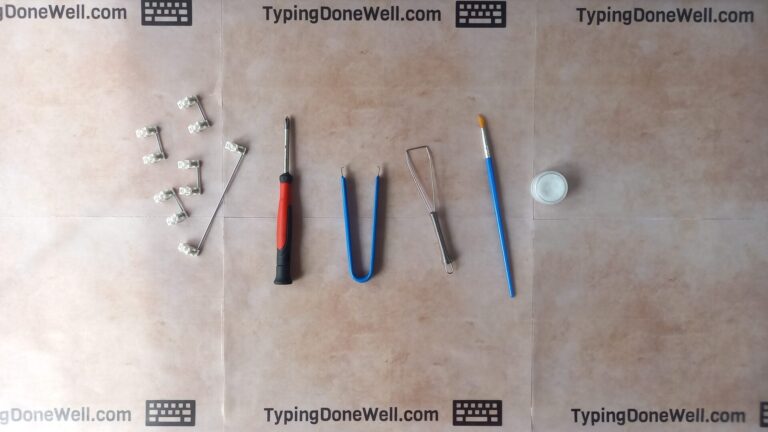
| Keycap puller | You’ll need a keycap puller. This tool will let you get the keycaps out of your keyboard. You can buy one here – BUY KEYCAP PULLER |
| Switch puller | The switch puller is the second unique tool that you’ll need for disassembly. This tool is essential. You can buy one here – BUY SWITCH PULLER |
| Small screwdriver | No need for an electric one. All you need is a fairly small screwdriver (that’s right for your keyboard’s screws) from your local hardware store. Alternatively, you can buy a whole set of precise screwdrivers here – BUY SCREWDRIVER SET |
| 4 containers (or plastic bags)+ 1 container for gasket mounted | You will need some sort of container for the parts of your keyboard. You will definitely need one for screws. Additionally one for each switches, keycaps, and stabilizers. If your keyboard is gasket mounted (higher-end) you’ll need also one for the gaskets. |
| + Tweezers | You don’t necessarily need them for disassembly alone. They can help. It’s worth buying them if you’re planning to lube your keyboard switches. |
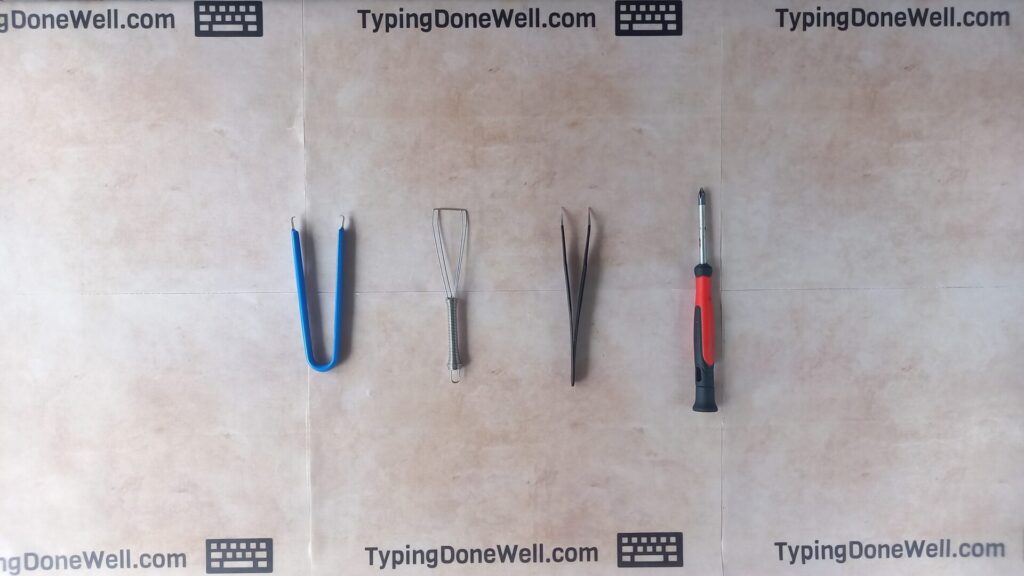
You will need a keycap puller, a switch puller, and a small screwdriver to disassemble pretty much any keyboard. Those tools are completely essential. You’ll need 4 containers for parts (plastic bags will work just fine). You can also use tweezers – those will help with small elements like connectors on the PCB.
How to disassemble your keyboard?
Disassembling a keyboard isn’t difficult. It is complicated when you’re doing it for the first time. But don’t worry, I will walk you through each step and give you all the important details that you need to remember.
First of all, let me give you a general idea of what a keyboard disassembly looks like:
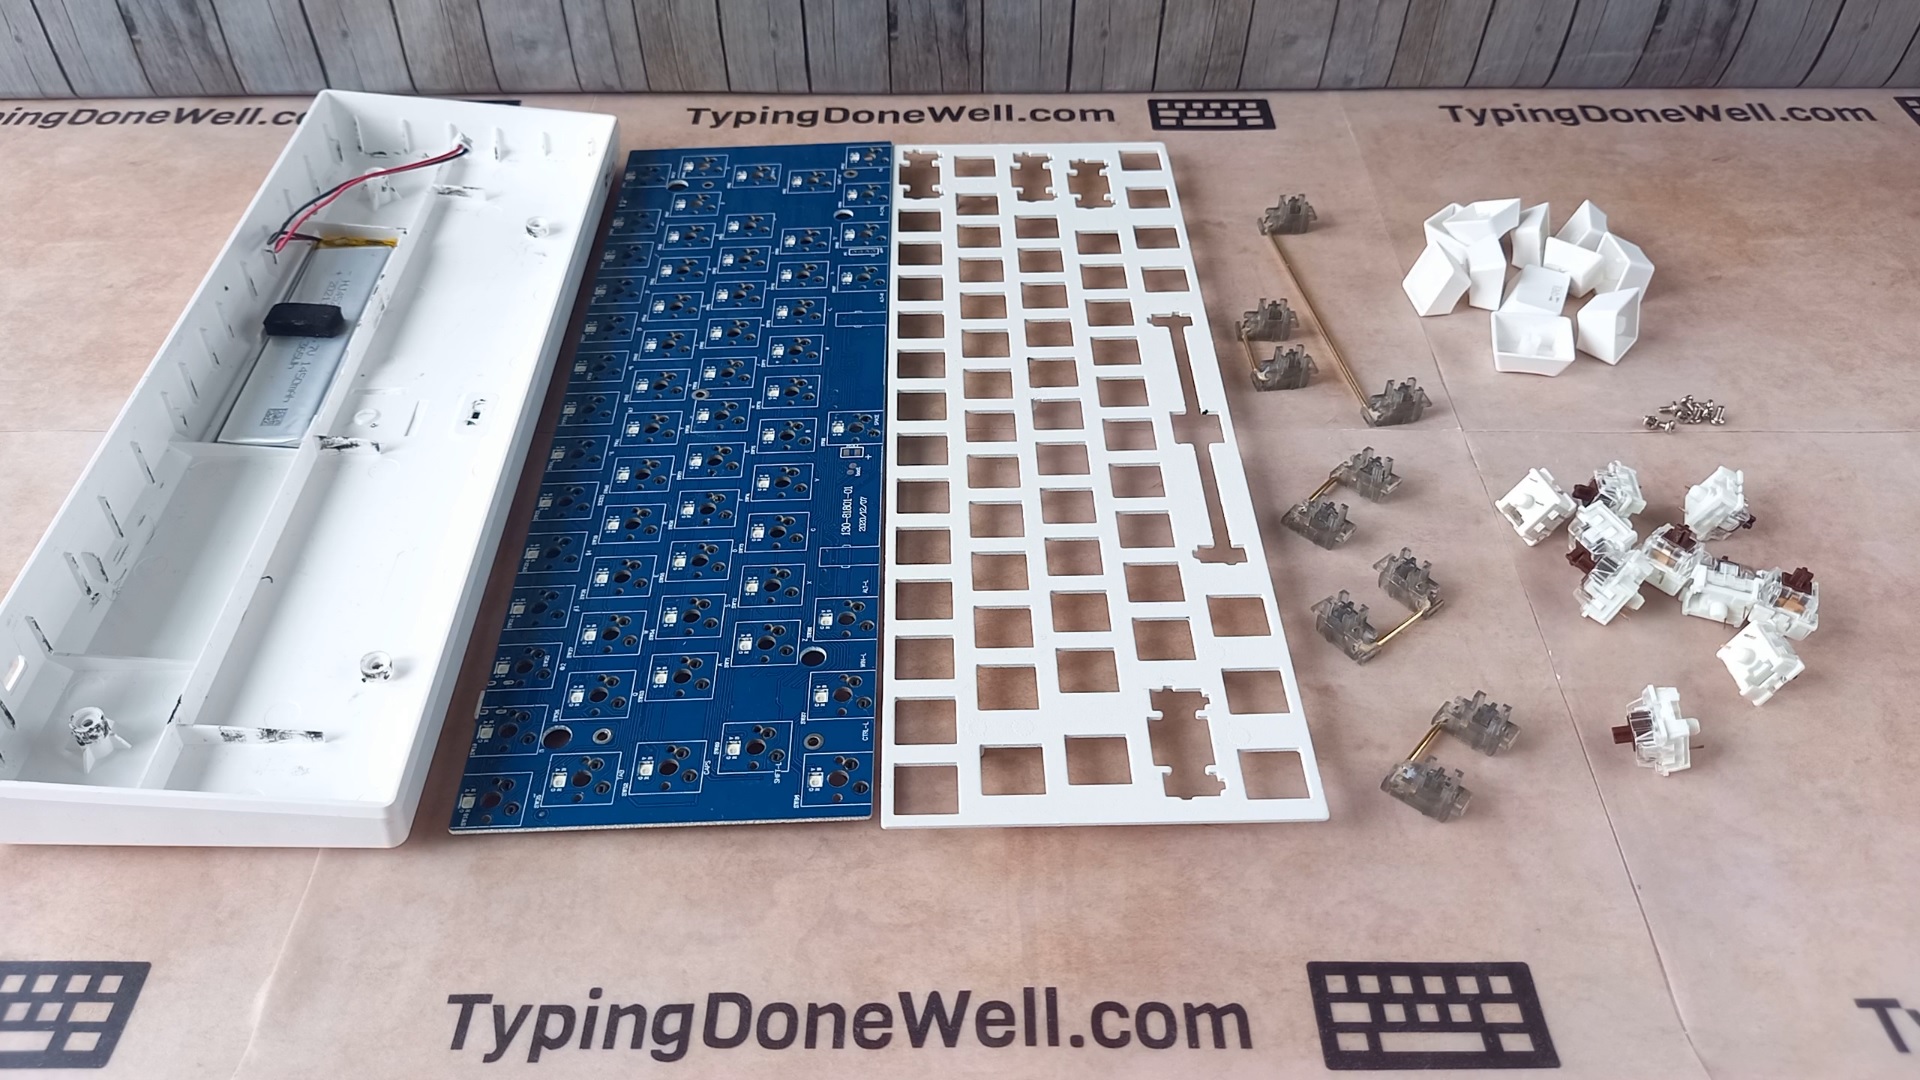
In order to disassemble your keyboard you need to: take the keycaps out, take the switches out, unscrew the plate from the bottom case, separate the PCB and the plate, and remove the stabilizers. Additionally, if your keyboard has any foams you need to remove those along the way.
That’s it. Disassembling a keyboard seems difficult and overwhelming in the beginning but if you know what to do it’s actually quite easy. Only a bit time-consuming. Now that you have a general clue of what you’ll be doing let’s go through each step individually.
Before you start
There are a few things that you need to do before you even start. Of course, you need to prepare a clean surface and tools. That’s obvious. But there are more important things to worry about.
- First of all, make sure your keyboard is off
Leaving your keyboard on while disassembling it can potentially damage your PCB and other electrical components. It’s always better to turn the keyboard off. Remember to check if you did.
- Take a photo of your keyboard
You will thank yourself later. Believe me, guessing the order of the keys that your keyboard is supposed to have isn’t the most fun you can have. Taking a photo will come in handy later.
Of course, those who are a bit more advanced don’t need to place the keys back in their original spot. You can change the visual layout of your keyboard. Still, take the photo. If you even decide to come back you’ll thank yourself. Plus you’ll know where for example function keys need to go.
1. Remove the upper cover (if your keyboard has one)
Many keyboards won’t have an upper cover. Don’t worry if yours doesn’t. This step is only for the keyboards that have an upper cover.
You just need to take it off. It will be attached with a few plastic clips. You should be able to just lift the upper cover with just a bit of force.
2. Take the keycaps out
The first proper step that’s universal to all keyboards is taking keycaps out. You need to remove all of those before going further. For this step, you’ll need a keycap puller. Here’s how you do it:
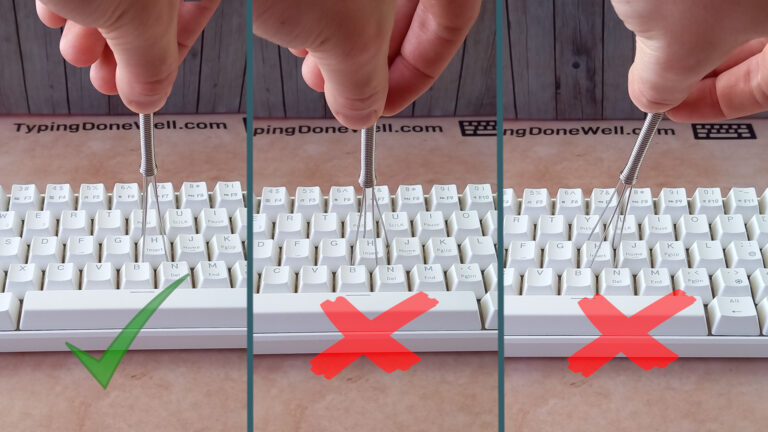
- First place the keycap puller around and behind the keycap. Make sure that it is properly placed – don’t twist it or lean towards the left or right. Keep it straight
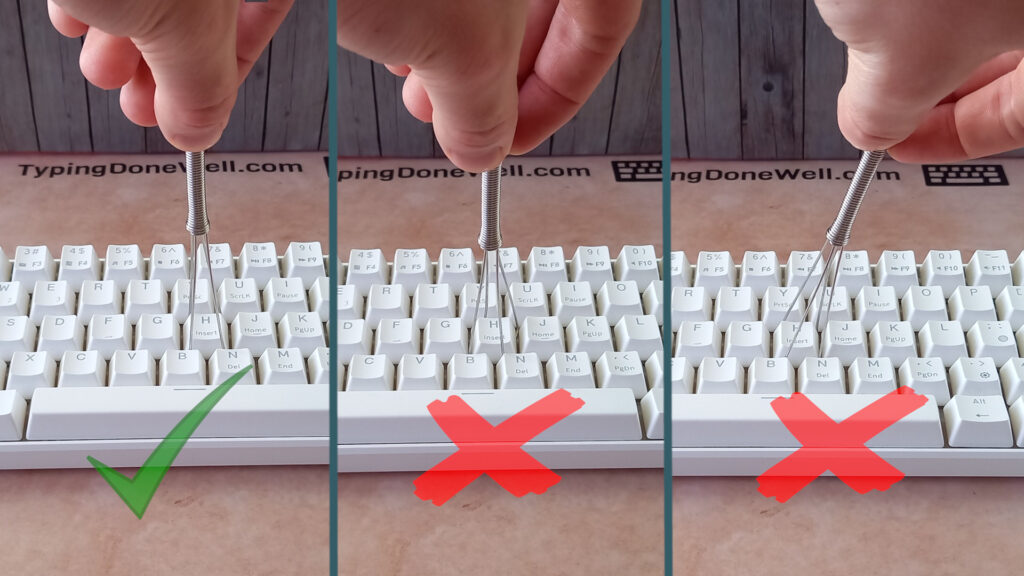
- When you’ve positioned the keycap puller properly start pulling it upwards. Start with a small force and keep on gently increasing it
Be careful, if you’re using a lot of force and the keycap doesn’t want to get out go back to the beginning. It’s possible you’re doing something wrong. Take it slow. Especially when you’re doing it for the first time.
That’s how you can pull all the regular keycaps + most stabilizer ones. However, the spacebar is a bit different. You need to use another technique. You might also need it if you have trouble reaching the keycap puller around other keys like Shift (depending on the keyboard).
- To pull out a spacebar keycap first start on one side. Place a part of the keycap puller under one side of the spacebar
Then gently lift it. It is very important that you are cautious with lifting one side of the spacebar keycap. You can damage stabilizers when using too much force.
- Then place the keycap puller on the other side of the spacebar and gently pull it. This will loosen up another side as well as the first one
- Finally, slide the keycap puller across to the middle of the spacebar. Pull it upwards while slowly increasing the force
I’ve made a video for you. This will make it easier to see the correct technique for pulling the spacebar keycap:
And with that, you have everything you need to remove all the keycaps from your keyboard. Place them in a container or a plastic bag. Both work. Make sure that you don’t lose any. Some keycaps can literally fly (from time to time) across the room. So be careful and don’t use too much force.
3. Take the switches out
Pulling the keycaps out was the first of the two highly technical steps when disassembling your keyboard. Taking the switches out of the keyboard is the second one. Make sure to take it slow. It’s easy to damage your switches if you rush this step.
To take the switches out of your keyboard you’ll need a switch puller.
- Place this tool around the switch on both the top and the bottom (when looking straight down at the keyboard). Make sure it says completely flat on the plate
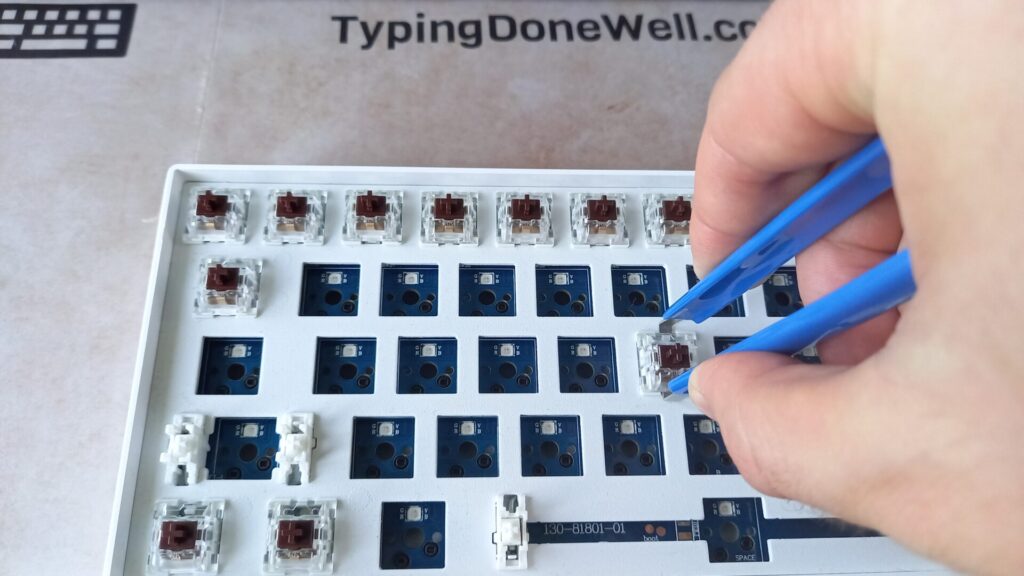
- Then squeeze it gently. It’s very important that you don’t use a lot of force. The „teeth” of the switch puller should only go about a halfway
If you use too much force you can damage your switch’s clips. This will cause them to be less attached to the plate. This is the reason why switches can sometimes be pulled out with the keycaps. That’s not good.
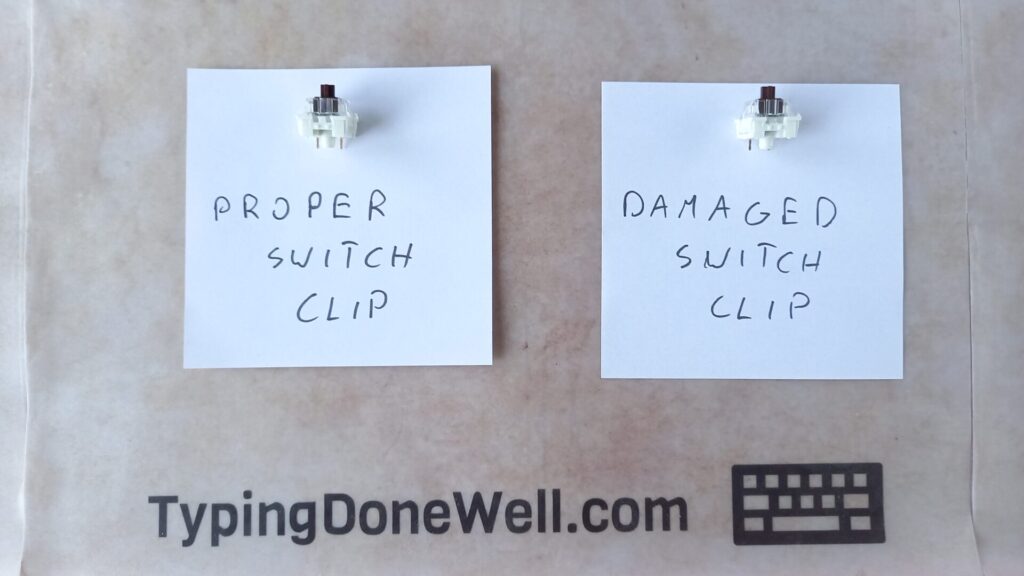
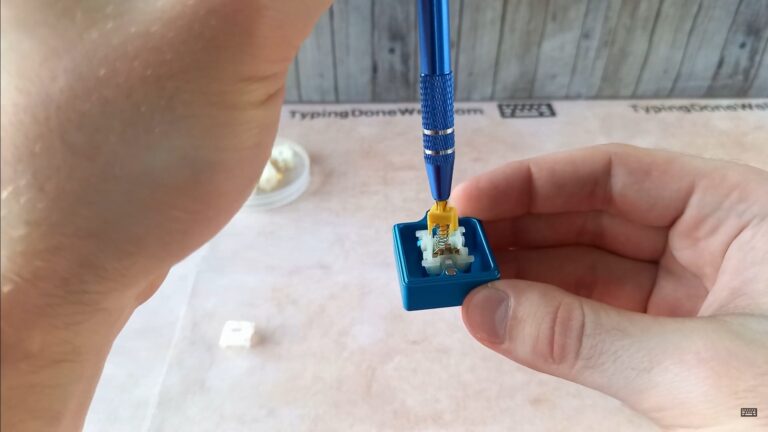
This photo shows what will happen when you squeeze the switch puller too much. This is something you don’t want to cause. That’s why you need to take it slow, especially when taking the switches out for the first time.
- Start gently pulling the switch out. You don’t need to use more and more force like with keycaps. Switches will slide right off once the clips are properly disengaged
I’ve made a video to show you what the whole process of taking the switch out looks like. Keep in mind that it’s faster because I have experience. Take it slow when doing it yourself for the first time.
That’s how pulling the switches out looks like in real-time. It’s actually very easy to pull them out (talking about the force). If you do it correctly switches will slide right out. I’m doing it while holding the keyboard in the air on the video.
Also a good tip from me: You can join together squeezing the switch puller and pulling it upwards
This will make it easier to catch the moment that the switch clips let go of the plate without pushing them too much inwards. So without breaking them.
I said it many times already but I’ll repeat it once more. Take your time. You don’t need to rush anything.
4. Remove the plate from the case
We have the two most technical steps behind us. Now it will be way easier – just taking the rest of the keyboard apart. So the next few steps can vary from one keyboard to another. But don’t worry. The most difficult and most important steps of keyboard disassembly are pulling keycaps and switches out.
- Locate and unscrew a few screws holding the plate to the keyboard
For this step, you need to turn your keyboard upside down. Then locate a few screws that are on the bottom case. Unscrew them. Be careful as the plate will simply fall out of the case. Make sure that you do this on a solid surface.
You don’t need to worry about the plate damaging itself when falling out of the case (that’s upside down). It’s not that delicate. Of course, if you’re really scared of damaging your keyboard you can always lay the keyboard on some sort of fabric. Like a towel or a t-shirt.
- Place the screws into a container (or a plastic bag). Don’t leave them on the side
I know this is quite obvious but I need to include it. When you unscrew any screws from your keyboard place them directly onto some sort of a container. You don’t want to lose them. Trust me.
- Slowly move the case out of the way and unplug any wires if needed
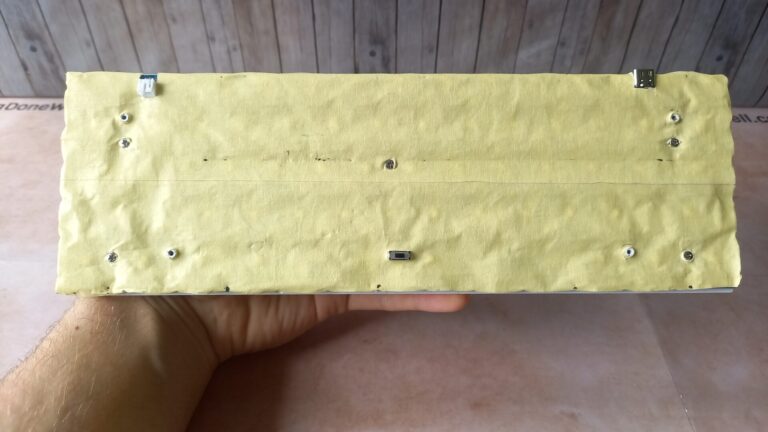
Many keyboards have a battery. Some keyboards even have a second PCB that’s created for a USB-c connector. Slowly move the bottom case out of the way so that you can unplug those wires if your keyboard has any.
- It’s worth noting at this point that some (higher-end) keyboards have gasket-mounted plates. If that’s the case you need to collect all the gaskets and place them into a container
I’ve made a quick video to show you this exact step of the process (on a non-gasket-mounted keyboard):
At this point, you’ll either have a plate with PCB attached to it or both of those parts separated. It depends on the keyboard. This means you’ll either do the next step or skip it.
From now on your keyboard’s PCB is out of the case. Be careful. This part of the keyboard is delicate. It’s very easy to damage the PCB by scratching it with sharp objects or by dropping it on the floor.
5. Separate the plate and PCB (if needed)
For some keyboards, you will skip this step. However, those are ones from a more premium segment. If you’re just starting out your keyboard most probably has a PCB that’s attached to the plate.
- Locate the screws (on the PCB side) and unscrew them
It can be quite challenging to find those screws. They can hide quite well between all the PCB components. Most of the time you can expect them on far corners and sometimes in the middle of the PCB.
- Place the screws into a container. In most keyboards screws will all be the same. However, always make sure that your keyboard’s screws aren’t different between those for the case and those for the PCB
If they are different you need to place them into another container so you don’t mix them. Obviously. But you wouldn’t believe how often we can make this mistake.
- Separate the plate and PCB. Plate the PCB in a safe place where it won’t get scratched or drop to the floor
If you can’t separate those two parts there’s something wrong. Stop. Go through the PCB and make sure you unscrewed all the screws. PCB and plate will simply fall separated once you do that. Without any force.
Here’s a quick video showing you this step of the process:
By the end of this step, you’ll have two separate parts – PCB and a plate. One of those parts will have stabilizers attached to it. In most cases, it will be the plate. However, for some of the keyboards that are a bit more expensive, you can find PCB-mounted stabilizers.
6. Remove stabilizers
There can be a difference in this step too. Don’t worry though. In most keyboards, the stabilizers will be mounted to the plate. Before you get to the higher-end keyboards, which can have stabilizers that are PCB mounted, you’ll already have experience.
- Before you start (for both plate and PCB mounted stabilizers): Make a photo of your plate focusing on the stabilizer orientation. You’ll place them back in the same way later
For plate-mounted stabilizers, you might need to take a photo of the underside of the plate. The upper side will block the view.
When it comes to PCB-mounted stabilizers you simply unscrew them from the PCB (screw on the side of both housings). Then you collect screws and washers (little o-rings) and remember the orientation that they were originally in. You’ll need that for reassembly later.
With that said I will take you step by step through taking out the plate-mounted stabilizers. This is something that beginners will come across.
That’s how you remove plate-mounted stabilizers:
- Locate a small pin on one of the stabilizer housings. Push the pin inwards while pushing the whole housing upwards
This will make the housing snap out of place. You might need to try this a few times before you get it right. You don’t need to move it too much now. Just slightly.
- Repeat the process for the second stabilizer housing. Push the pin to dismount it from the plate
- When both housings are dismounted remove the whole stabilizer by twisting the housings and pushing it upwards. Make sure to move it so that the wire passes through the plate’s hole
I’ve made a short video to show you this step of the process. Here’s how you should do it:
This is the last step. After that, you’ll have your keyboard fully disassembled onto all the parts. Of course, you can disassemble a switch further (for lubing) or a stabilizer (for mods). But that’s a subject for a whole other article.
If you want to read about the disassembly of a keyboard switch you can do it here – ARTICLE DISASSEMBLE KEYBOARD SWITCH. Also, you can check out my other article about modding your stabilizers here – ARTICLE HOW TO MOD STABILIZERS
The whole process all together
This is not a step of disassembly. In the end, I want to show you the whole process of disassembling your keyboard from start to finish in one video. This will help you visualize what you need to do. And remind you.
Keep in mind that this video doesn’t cover all the important details of disassembling your keyboard. There are nuances that you need to remember when doing it. Especially for the first time. Especially beginners.
If that’s the first time you’re disassembling your keyboard go through each step one by one. Take your time. You don’t need to rush anything. I’m sure you’ll be just fine disassembling your first keyboard with this guide.
How to reassemble your keyboard?
You already know how to disassemble your keyboard. But there’s a problem. How do you reassemble it so that everything works? I could tell you just to backtrack your steps during disassembly but that wouldn’t be very helpful, would it?
Especially that, similarly to disassembly, there are a few details that can either help you or cause damage to your keyboard. Although in my mind reassembly is easier and faster you still can damage your keyboard doing it wrong.
That’s why I’ll take you step by step through the reassembly of your keyboard. It, once again, may vary. Depending on the keyboard. But there are a few fundamental steps and some techniques that will guide you through the whole process. No matter what keyboard.
Before you start
Just like with disassembly you need to check a few things. Of course, if the keyboard is off (but nobody would turn it on when in parts). You need to prepare a safe and clean workspace etc. You already know that.
- It’s crucial to check for the clearance of all the mods you’ve done to your keyboard
It’s for everyone who modded their keyboard. You need to check if your mods fit your keyboard. If everything will work back together just like it’s supposed to do.
Don’t use force. Don’t squish the elements together when checking for clearance. Make sure that all the mods work well with the keyboard. Like intended. Things like too thick sound dampening case foams or incorrectly cut tape for tape mod can cause clearance issues.
1. Attach stabilizers
The first step is placing stabilizers back in their original place. This will be different for higher-end keyboards that have PCB-mounted stabilizers. However, until you get such a keyboard you’ll have more experience.
Here I’ll focus on all the beginners. I’ll show you the process of attaching stabilizers to the plate – something people just starting out will encounter in the majority. Here’s how you do it:
- First, you’ll need a photo that you took a while back. This will be easier to get the stabilizers’ orientation correct
Did you lose the photo? That’s a shame. Now you won’t be able to assemble your keyboard back together. I’m joking! Of course, you can figure out the correct orientation without the photo. It’s easier with but I’ll show you how to do it without the photo in case you lost it:
First, get your plate in front of you. Locate the holes for stabilizers. What you need to do is look for the flat side and align it with the clip on the stabilizer housing. It means that the stabilizer wire goes on the opposite side to the flat side.
This method will save you in case you forgot to take a photo of your stabilizers’ orientation. Hope it helps.
- Place the stabilizer in the correct orientation. Pass the wire through the hole and start pushing the housings down towards the non-flat side of the hole
You also need to place the stabilizers in the correct location. Luckily, there’s only the difference between smaller stabilizers and the spacebar stabilizer. There’s no distinction between the smaller ones.
I took a video to show you the process of placing stabilizers back on the plate. Here it is:
That’s how you do it. Now all that’s left is to repeat this process for all the rest of the stabilizers. Then you can move on to the next step.
2. Screw the PCB and plate back together (if needed)
There are keyboards that don’t have PCB that’s mounted to the plate. It’s called a sandwich mount. That’s when the PCB is simply placed inside the case and the plate is mounted on top of it. That way the plate holds the PCB in place. Like a sandwich.
However, if your keyboard has PCB that’s mounted to the plate it’s time to screw it back together. You know whether or not your keyboard has this mounting system because of the disassembly.
- Prepare the screws that you need for this step
This is where the screws’ container comes in handy. You need to take the appropriate screws for mounting the PCB onto the plate. Also, it’s better to only take the amount that you need and leave the rest of the screws safe.
- Place the PCB and plate the way they are supposed to be attached
- Locate the holes for the screws and join the PCB and plate back together
It’s always easier to visualize it on a video. Here you can watch this step of the process:
Remember not to use too much force for the screws. PCB is a very delicate component so you don’t want to use a lot of force. Screw all of the screws in until there’s a bit of resistance. Then go back to every one and tighten it the slightest amount.
3. Screw the plate into the case
At this point, you should have the PCB and plate ready to attach to the case. That’s what we’ll do next. This step can be a bit tricky so if you’re very worried about damaging your keyboard you can place a towel under it. For added protection.
- Place the case and plate with PCB next to each other. Connect the wires if your keyboard has any
Most keyboards will have a wire that you need to attach. Like a battery one. Carefully plug the connector into the right place without using a lot of force. Those small connectors snap easily.
If the wire’s connector doesn’t want to slide in the right place make sure you’re doing it right. It’s easy to damage your PCB when using a lot of force.
- Prepare the right screws for the case. Same ones that you placed into a container when disassembling the keyboard
- Place the plate with the PCB inside the case
At this point, it’s not attached yet. The plate with PCB should just sit in the case. That’s a good time to double-check for the clearance. Does the PCB fit? That’s especially important if you modded your keyboard.
- Prepare screw on your screwdriver. Turn the case with the plate and PCB upside down while holding the plate from the bottom. Secure it by screwing it (loosely) to the case then place the correct way up again. Repeat for another screw (on the opposite side)
This is a tricky part. If you just turn your keyboard’s case upside down the plate and PCB will slide right out. That’s why you need to prepare a screw and secure the plate to the case while holding it.
There’s also another way. You can just place a piece of folded t-shirt (or other fabric) in the case. Then when you turn it upside down the fabric will hold it in place allowing you to screw all the screws in. I prefer the first way.
- After you secure the plate with two screws you can place it upside down. Screw the rest of the screws. The first two will hold the plate in place. Use only a bit of force – until the first resistance
- When all the screws are in place tighten all of them ever so slightly. Be careful not to use too much force
And that’s this step done. I’ve made a quick video to show you how to screw the plate to the case while holding it upside down. It’s not as hard as it sounds.
Now you should have a case with a plate and PCB attached. That’s good. There are only a few steps left and those are more technical ones.
4. Place the switches into the keyboard
Placing switches into your PCB is something that can go wrong. You can quite easily damage your switch pins. Maybe even the PCB. It is important that you use the proper technique when placing the switches into your keyboard.
- Align the switch correctly
Let’s focus on placing only one switch into the keyboard at a time. Actually, let’s break it down even more. The first thing is aligning the switch correctly.
First of all, the switch pins have to line up with the pin holes in the PCB. Yes but what does it mean exactly? Pins on the bottom. That’s the easiest way to say that.
Of course, you need to check where the holes for pins are and where your switch’s pins are. On pretty much all the keyboards this will mean the same switch orientation. Pins on the bottom. Still, you always need to double-check.
- Place the switch into the plate and gently press down
Don’t use a lot of force. Just don’t. If the switch is aligned correctly it will literally slide into the place with no resistance (the exception is PE foam mod). If the switch doesn’t want to slide with very little force you need to align it once again.
It’s very easy to bend or completely destroy your switch’s pins. And that will make the switch unusable. You could save it by repairing the pins but it’s better to just take things slow. I’ll show you what can happen if you’ll use too much force:
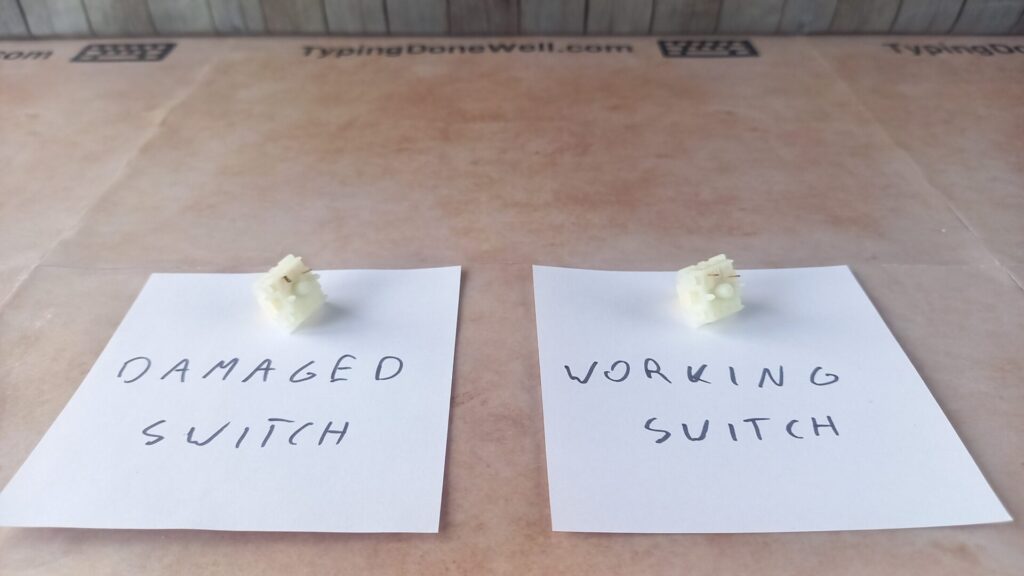
This is quite extreme. I used a lot of force to bend those pins so much. However, even a slight bent can cause you trouble. Take things slow. If the switch doesn’t want to easily slide into place check the alignment again.
Here’s how assembling the switches onto your keyboard should look like:
You don’t need to use a lot of force. The switch will slide easily with pretty much no resistance if everything is aligned correctly.
5. Place the keycaps onto your keyboard
Placing the keycaps onto your keyboard seems pretty straightforward. And it is. At least for the most part. For all the regular keys that don’t have stabilizers, the process is easy.
- You will need a photo that you took before disassembling your keyboard. This will be a great reference point to place the keycaps back into their destined place
If for some reason you don’t have this photo don’t worry. You need to find a photo of the exact keyboard like yours on the internet. Use it as a reference. A bit more cumbersome, that’s why it’s always better to take a photo yourself.
- Start with keys without stabilizers. It’s better to make sure the keycap set is right before you move onto stabilizers (which bad keycaps will damage)
- For keys without stabilizers: First, you need to align the keycap in the correct place and orientation
It’s really annoying if you place a keycap in the wrong place and you have to pull it out again and move. Even more annoying if you mess up a whole bunch of keycaps that way. Don’t do it.
- For keys without stabilizers: Next start pressing the key down without much force. Check if everything is alright and press again until the keycap goes all the way down
As simple as that. Although you need to be careful – some keycaps are way harder to press down than they should be. This may cause you trouble later.
If the keycap is insanely hard to press all the way down and once you pull it off it comes out with the switch you should change the keycap set. Don’t use this one. Return it and buy a better set.
- For keys with stabilizers: It is important to align those keycaps the correct way with stabilizers
There are some keycaps that have different spacing for stabilizers’ stems. Always check if the keycap you’re about to place fits your keyboard. There’s an easy way to check it. Turn your keycap around. Upside down. Then you can see if the holes and stabilizer stems line up.
- For keys with stabilizers: Next start pressing the key from the middle. Slowly move towards first one side then the other. Release the key
- For keys with stabilizers: Make sure that the keycap is attached to both the switch and the stabilizer. Press the key until the keycap goes all the way down
If you feel the keycap is very hard to press down make sure it’s aligned properly. If everything’s fine but the keycap is still difficult to press down – stop. Don’t press it. Carefully take the keycap out and change the set.
It’s even more important with keycaps that go on stabilizers. You can easily pull the stabilizer stem out of the housing (destroying it). I did it once. It’s not fun, especially when you have good stabilizers on.
That’s why it’s also better to start from keys without stabilizers. You get a chance to test the keycap set and make sure it’s not too difficult to mount. If it’s good. Then move on to keys with stabilizers.
The whole process all together
I’ve guided you through each step of reassembling your keyboard individually with everything important to know. All the details. Now I want to show you the whole process all together to make it easier to visualize:
That’s it. Now you know the whole process. You can always come back to this article and read some of the steps again if you need to.
There’s a handy Table of Contents floating on the right side of your screen that will take you to whichever place in the article. You can use it to read one step in particular.
In the end, it’s worth noting that you can stop at any point doing the disassembly process. You don’t have to take the keyboard completely apart every time. It depends on what you want to do with your keyboard.
Now, it’s time to end this article. I think I told you completely everything you need to know to disassemble and reassemble a keyboard without prior experience. Well, this article is extremely long so I hope that’s everything you’ll ever need.
I hope my article helps you. If you have any questions let me know in the comments down below. And remember – take your time! Especially if you’re doing it for the first time.
